Show index Hide index
- 5 Quick Black Christmas Nails Essentials for an Edgy Holiday Manicure Tutorial
- 5 Essential Techniques for Gothic Christmas Nails: Matte, Gems & Snowflakes
- 5 Festive Black Nail Art Ideas for Parties: Holly, Snowflake & Gold Accents
- 5 Durable Holiday Manicure Tutorial Steps: Prep, Protection & Time-Saving Hacks
- 5 Styling Pairings & Photo Tips for Black Christmas Nails: From Cozy Sweaters to Glam Looks


5 Quick Black Christmas Nails Essentials for an Edgy Holiday Manicure Tutorial
Start with the core: a reliable product stack drives salon-quality results fast. Choose a rich Black Nail Polish (gel or lacquer), a strengthening base coat, and a high-gloss top coat to lock shine and resilience. ✨
The quickest route to an Edgy Holiday Manicure is preparation: trim, shape, and buff nails, then dehydrate the plate with alcohol before any polish. This single step reduces lifting and makes intricate Christmas Nail Art hold longer.
For those aiming to DIY, invest in three tools: a thin liner brush for fine motifs, a dotting tool for berries and snow, and a quality LED lamp if using soak-off gel. These items transform a simple Black Christmas Nails base into detailed seasonal looks in under 45 minutes.
Actionable plan: apply a strengthening base coat, two thin coats of black, paint accents while slightly tacky, then finish with a durable top coat. Estimated time: 35–50 minutes. 🔧
Example: At the fictional Nocturne Nail Studio, a stylist preps two clients in parallel—one chooses a glossy black with a single gold stud, the other picks matte black with hand-painted holly. Both receive a quick buff and a jojoba-based cuticle oil finish for longevity; the result is distinct but equally festive.
Pin-friendly tip: use a mix of finishes (matte base + glossy accent nails) to create contrast that photographs well on mobile—perfect for Pinterest saves. 📌 For further design prompts, explore curated galleries like edgy and chic black Christmas nail ideas and seasonal collections at 23 Black Christmas Nails Ideas 2025.
To read Pink Christmas Nails: Cute and Festive Manicure Ideas
Key supplies to start with: quality black lacquer, thin liner brush, dotting tool, base/top coats, cuticle oil. 🔥 This compact kit yields striking Festive Nails that are both edgy and wearable.
5 Essential Techniques for Gothic Christmas Nails: Matte, Gems & Snowflakes
Begin with the visual goal: a moody, festive aesthetic that balances gothic edge with holiday motifs. Matte black provides an elegant base that reads modern and dramatic in photos, while gems and metallics add holiday sparkle without juvenile themes.
Technique one: matte foundation with glossy accents. Paint nails with two coats of black, cure or dry, then apply a matte top coat. Use a glossy top coat to highlight a single nail or a small stripe—this contrast reads luxurious and intentional.
Technique two: gemstone placement. While polish is tacky, position small rhinestones along the cuticle or in vertical lines. Secure with a gel top coat for long wear. This creates Gothic Christmas Nails that double as jewelry for the hands.
Technique three: hand-painted snowflakes and stars. Start with a fine liner brush and white gel or polish; sketch an X, add diagonals and tiny dots. The trick is to keep strokes crisp; practice on a plastic palette before applying to nails.
Technique four: gold leaf and flakes. Press gold leaf pieces onto a tacky black finish, then seal with a sturdy top coat to prevent peeling. The result is a dramatic, textured accent that captures light at parties.
Technique five: holly micro-art. Paint tiny green leaves near the tip or cuticle and add three small red dots for berries. This miniature approach keeps the look refined rather than cutesy.
To read Classy Christmas Nails: Elegant Designs for Special Occasions
Example case: a fictional customer, Ava, requested an Edgy Holiday Manicure that could survive gift-wrapping and cocktail hour. The technician combined matte black nails, a single crystal cluster on the ring finger, and micro-holly accents—final wear: 10 days with minimal touch-ups.
Common mistakes and fixes: overly thick coats = bubbling; fix by applying thinner layers and curing longer. Placing gems on fully cured polish risks falling off; place on tacky gel instead. 🛠️
For visual inspiration and technique breakdowns, check galleries and step tutorials at Christmas nail designs in black and trend pieces at stylish black Christmas nails trends.
Final takeaway: combine matte texture, precise linework, and a single jeweled focal nail to achieve a gothic-meets-festive result that photographs beautifully. ✨
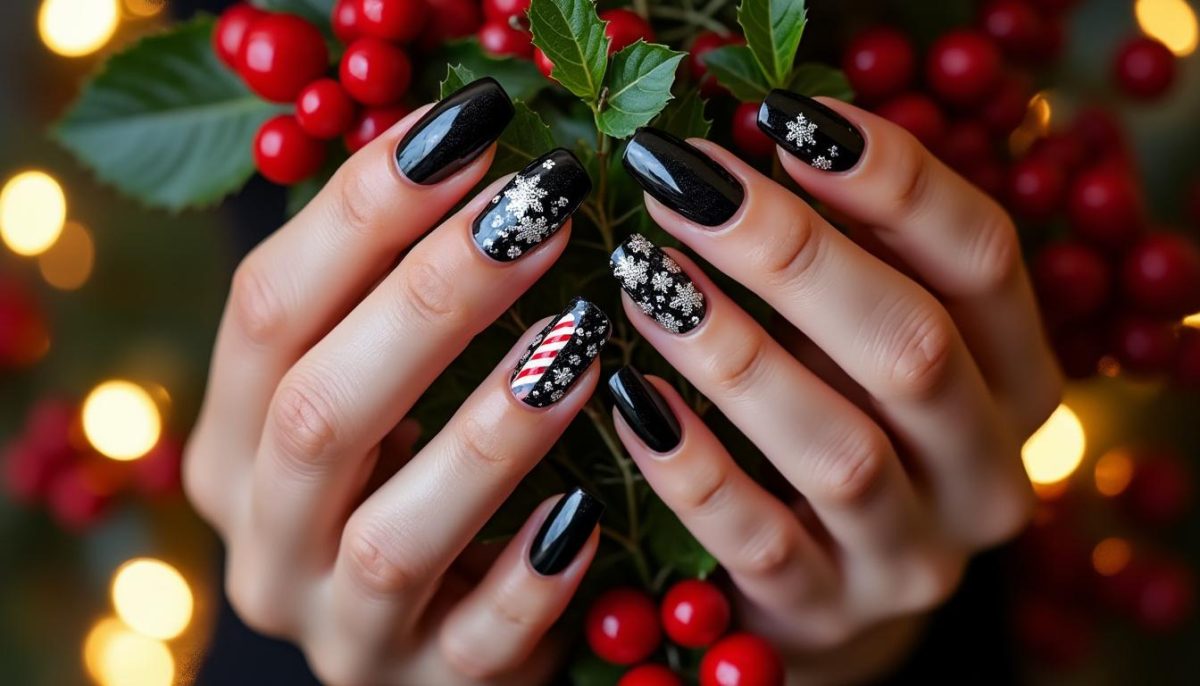
5 Festive Black Nail Art Ideas for Parties: Holly, Snowflake & Gold Accents
Make each nail a mini holiday scene: use the black base as night sky and layer motifs for instant festive drama. That approach yields salon-worthy Christmas Nail Art that stands out in photos and at parties.
Design concept A: mirrored holly tips. Paint an almond-shaped glossy black base. Add tiny layered green leaves and three red dots at the tip for a sophisticated holly accent. Add a minuscule crystal for sparkle and seal with top coat.
Design concept B: silver snowflake cluster. Use a fine white gel to draw one detailed snowflake on an accent nail, then dust micro-silver glitter around it for a frosty halo effect. This feels luxe and seasonally relevant.
To read Christmas Nail Ideas: Fresh Inspiration for Your Manicure
Design concept C: gold foil crescent. Apply gold leaf in a crescent near the cuticle to mimic a festive moon above the black base. Top with a gel seal to prevent edges from catching on gloves.
Design concept D: negative-space holiday wreath. On a black background, paint a thin ring of green leaves on one nail, leaving the center black for contrast. Tiny red berry dots finish the look elegantly.
Design concept E: midnight gem ombré. Start black at the cuticle and blend into a shimmering charcoal or gunmetal at the tip, then line the center with a vertical row of tiny gems to mimic falling lights.
Practical step-by-step for a snowflake accent: apply base, two coats black, sketch snowflake with thin white liner, add tiny silver dots around edges, cure and topcoat. Time required: 20–30 minutes per hand for detailed work. ⏱️
Errand-friendly variants: keep most nails solid black and use one or two accent nails for motifs; this saves time and reduces chip risk while maintaining visual impact. For more motif libraries and variations, consult creative roundups such as simple black Christmas nails and pictorials at black Christmas nail ideas.
Social sharing tip: photograph designs in natural light near warm decorations; black bases absorb flash, so soft side light brings out metallic accents best. 📸
Insight: using black as the anchor color allows delicate holiday motifs—holly, snowflakes, gold flakes—to read upscale and modern rather than childish. 🎄
To read Red Christmas Nails: Classic Holiday Manicure Tutorial
5 Durable Holiday Manicure Tutorial Steps: Prep, Protection & Time-Saving Hacks
Longevity beats complexity: a well-prepped black manicure lasts longer than an intricate, rushed one. Focus on adhesion and protective layers to ensure festive designs survive wrapping, cooking, and photos.
Step 1: prep. Remove oils with 70% isopropyl alcohol, push back cuticles, and lightly buff the surface. This improves adhesion dramatically and results in fewer chips.
Step 2: base coat. Apply a strengthening base coat to protect the natural nail from staining by deep black pigments. This reduces yellowing and makes removal safer later.
Step 3: thin color layers. Apply two thin coats of black, curing each (or allowing full dry time for lacquer). Thin layers cure uniformly and resist bubbling.
Step 4: seal strategically. Use a flexible gel top coat where the nail meets skin (the stress point) and a hard gloss over the center to resist scratches. Reapply a top coat every 3–4 days for upkeep.
Step 5: maintenance routine. Apply a nourishing cuticle oil nightly and wear gloves for chores. These small habits extend wear time and keep edges from lifting.
Time-saving hacks: paint only four nails fully and do quick accent tips on the thumb for a trendy negative-space look that reduces painting time by ~20 minutes. Budget-friendly alternatives include using quick-dry topcoats and adhesive gems instead of real rhinestones.
To read Christmas Gifts Ideas: Complete Shopping Guide
Common durability mistakes: skipping base coat, thick layers, and not sealing the free edge. Fixes: always swipe top coat across the free edge and avoid water immediately after finishing.
For professional-level tips and seasonal troubleshooting, reference robust how-tos at Black Christmas Nails collection and practical guides like what Christmas nails should you try.
Final insight: invest 10 extra minutes in prep and a trusted top coat and the festive manicure will survive more events and photos—making the effort worthwhile. 💪
5 Styling Pairings & Photo Tips for Black Christmas Nails: From Cozy Sweaters to Glam Looks
Pair nails with outfits intentionally: black nails can read cozy or couture depending on accessories and textures. Use finishes and accents to match the event—matte black for coffee-and-sweaters, glossy black with gold for evening parties.
Cozy pairing: matte black with tiny white snowflakes pairs beautifully with chunky beige knits and warm-toned scarves; it complements a neutral holiday brunch look. Add a muted ring stack to accent the matte finish without overpowering it.
Office-friendly pairing: a short, square glossy black with a single gold stud on the ring finger works with blazers and velvet dresses—subtle but polished for workplace holiday gatherings.
Party pairing: long almond glossy black with crystals and gold foil pairs with satin slip dresses and statement earrings for a high-glam effect that photographs well under lights.
Casual-chic pairing: black base with evergreen micro-leaves matches leather jackets, dark denim, and bold red knit hats for a stylish market or tree-lighting outing.
Photography tips for Pinterest: use side lighting to emphasize texture contrasts, include a wrapped gift or fairy lights in the frame, and prefer a neutral background so Festive Nails remain the focal point. Add a “Save for reference!” caption for shareability. 📌
Example scenario: a content creator styled three outfits around a single manicure—sweater brunch, office party, night out—proving the versatility of black bases and strategic accents across multiple events in one holiday week.
For more outfit-driven inspirations, explore seasonal lookbooks and curated images at stylish black Christmas nails ideas and visual guides at creative black Christmas nails. For quick DIY inspo and alternative color combos, see Christmas nail inspo and easy Christmas nails.
Closing insight: black is the most versatile holiday polish—controlled accents and thoughtful styling let it transform from cozy to glam in minutes. 🎁