Show index Hide index
- 5 Easy Christmas Candy Recipes for Homemade Holiday Gifts That Actually Work
- How to Package Christmas Sweets for Gifting: Festive Presentation and Practical Tips
- Candy Making Basics: Tempering Chocolate, Perfect Fudge, and Reliable No-Bake Sweets
- Time-Saving Holiday Treats: Quick Homemade Sweets Under $20 and Scheduling for Season
- Creative Seasonal Gifts: Bundles, Themes, and Cottage Industry Ideas for Christmas Candy


5 Easy Christmas Candy Recipes for Homemade Holiday Gifts That Actually Work
Main point: Choose reliable, simple recipes so homemade Christmas Candy becomes a repeatable gift, not a one-off experiment. Start by picking recipes with clear time, temperature, and storage details to guarantee consistent results.
Why this matters: Homemade sweets meant for gifting need predictable texture, shelf-stable packaging, and festive presentation. Ambiguous recipes lead to fudge that weeps or truffles that bloom.
How to act now: Commit to five proven recipes: Peppermint Bark, Chocolate Truffles, Peanut Butter Buckeyes, Salted Caramels, and Buttery Toffee. For each, follow a short checklist: ingredient temperature, exact grams or cups, cook time, and cooling method. These checklists remove guesswork and speed production.
Peppermint Bark delivers immediate holiday appeal and requires only 15 minutes active time and 30 minutes chilling. Melt 12 oz dark chocolate, spread to 1/8-inch, top with 8 oz white chocolate swirled and 1 cup crushed candy cane. Chill until firm. Package in acetate boxes for a polished look. This recipe is perfect for beginner candy makers and makes ~12 2×2-inch pieces.
Chocolate Truffles are flexible for flavoring and gifting. Heat 8 oz heavy cream to simmer, pour over 16 oz dark chocolate, whisk, refrigerate until scoopable, then roll and coat. Add a tablespoon of liqueur or 1/2 tsp orange oil per batch for seasonal variants. Truffles last two weeks refrigerated; include a small ice pack in transit for longer trips.
Peanut Butter Buckeyes are low-tech, high-delight. Mix 1 1/2 cups peanut butter, 1/2 cup butter, and 3 cups powdered sugar, chill, form 1-inch balls, dip leaving a dot of peanut showing. This no-bake candy keeps for 10 days at room temperature when stored airtight.
To read Christmas Gifts Ideas: Complete Shopping Guide
Salted Caramels create a premium gift. Use a candy thermometer and aim for 245–250°F (118–121°C) for soft caramels. Pour into a lined 8×8 pan, cool fully, and cut into 1-inch squares. Wrap each in parchment and finish with a sprinkle of fleur de sel.
Buttery Toffee pairs well with nuts and chocolate and stores for weeks. Cook sugar and butter to 295–300°F (146–149°C), pour over a baking sheet, top with 8 oz chopped chocolate, spread, and chill. Break into shards and package in a festive tin.
Tips to scale: Double truffle or bark batches on the same day; stagger cooling racks and rotate pans to manage workspace. Pre-weigh ingredients into labeled bags the night before for assembly-line efficiency. This method saves at least 30% of prep time and keeps quality consistent. 🎁
Extra resources: Find more tested recipes and inspiration for holiday candy plates and gifting ideas at trusted recipe roundups like classic candy guides and curated collections such as homemade candy recipes.
Final insight: Start with these five proven recipes, document exact steps, and packaging will transform them into sought-after seasonal gifts. Pin for later! 📌
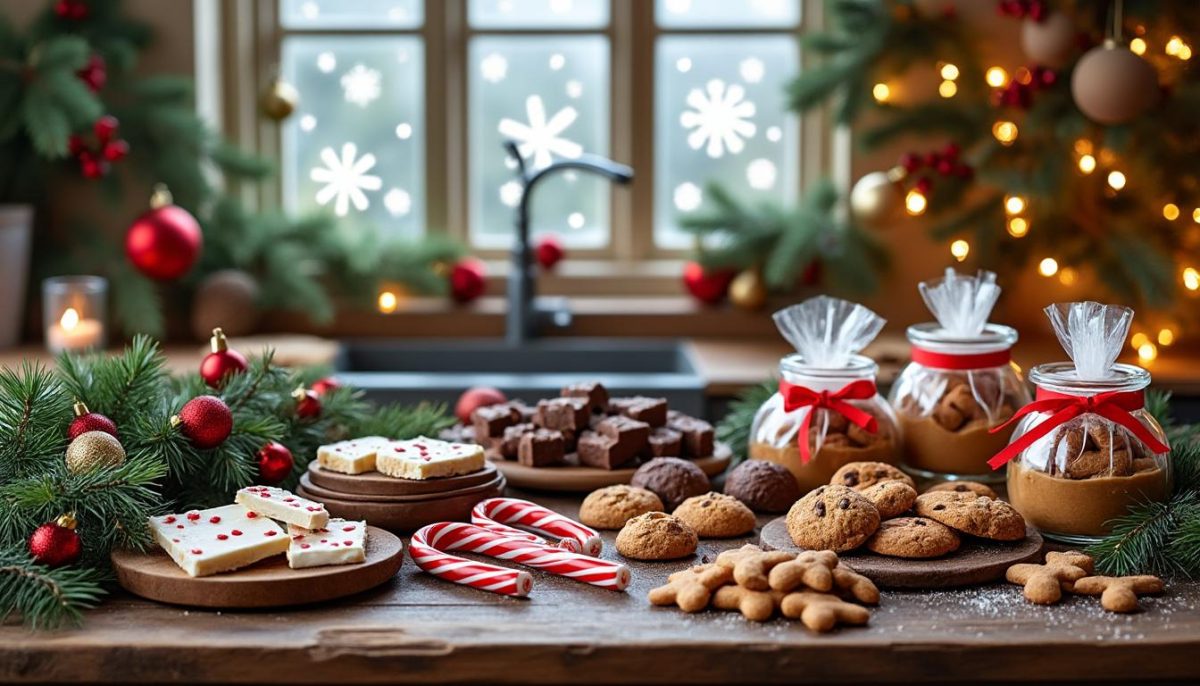
How to Package Christmas Sweets for Gifting: Festive Presentation and Practical Tips
Main point: Presentation is as important as taste for Holiday treats; choose packaging that protects candy, communicates care, and reduces cost per gift. Prioritize airtight options and temperature control where needed.
Why presentation matters: Handmade sweets become memorable seasonal gifts when wrapped thoughtfully. Clear packaging shows the product, personalized labels tell the story, and insulated boxes prevent meltdowns during transit.
To read Christmas Candy: Homemade Recipes and Gift Ideas
Action plan: For each recipe, match packaging to stability: truffles and caramels need refrigerated transit, while toffee and peppermint bark are shelf-stable. Buy or source cellophane bags, cardboard candy boxes, small tins, and parchment squares. Use color-coded labels to indicate storage instructions: blue for fridge, green for shelf-stable.
Packaging materials checklist: stock 100 clear cellophane bags, 20 small hinged tins, 10 glass jars with lids, and rolls of parchment and wax paper. These materials allow flexible options for singles, mini assortments, and large gift boxes. For eco-conscious recipients, use compostable cello or kraft boxes.
Step-by-step packaging example — truffles: Cool truffles completely, place a square of parchment at the base of a 3×3-inch box, arrange 6 truffles on a single layer, add a scented paper insert (e.g., cinnamon), close, and tie with a 12-inch ribbon. Attach a small label with ingredients and storage: “Keep refrigerated. Best within 10 days.”
Step-by-step packaging example — bark: Stack bark pieces between layers of parchment in a clear jar or box, add a ribbon and a card stating: “Peppermint Bark — 15 minutes prep, keep cool.” This clearly sets expectations and prevents complaints about sticky chocolate.
Budget tips: Source bulk tins and bags online to lower cost per unit under $1.50 each when buying in quantities of 100+. Use seasonal sales in November to stock up. For inspiration and DIY ideas, reference creative lists such as DIY candy gift recipes and packaging and craft-themed decor ideas at holiday DIY decor.
Labeling and allergen info: Always list major allergens (nuts, dairy, soy, gluten). Use a small printed sticker or handwritten kraft tags with ink that resists smearing. For larger batches, create a printable label template to save time and ensure consistency across gifts.
Shipping and temperature control: For nationwide shipping during warm weather, include insulated liners and frozen gel packs. Choose two-day delivery windows and clearly communicate arrival expectations to recipients. For local deliveries, use insulated totes and place cold items at the bottom.
To read Christmas Snacks: Easy Treats for Parties
Visual styling tips: Coordinate ribbon color with candy hue for eye-catching contrast. Use sprigs of evergreen or cinnamon sticks tucked into ribbons for a sensory touch. Photograph a sample gift for social sharing—Pinterest-friendly images help scale gifting patterns and inspire recipients to save the idea.
Where to learn more: Packaging inspiration and step-by-step visuals are available at lifestyle roundups like holiday candy collections and craft-focused galleries such as Christmas craft ideas.
Final insight: Match packaging to candy stability and recipient expectations to turn homemade sweets into premium, memorable seasonal gifts. Save this guide for assembly nights — Pin for later! 🎀
Candy Making Basics: Tempering Chocolate, Perfect Fudge, and Reliable No-Bake Sweets
Main point: Mastering three fundamentals — tempering chocolate, precise temperature control for caramels and toffee, and proper refrigeration for fudge — eliminates the majority of candy failures.
Why these basics change results: Tempering ensures glossy, snap-back chocolate coatings; temperature control governs sugar crystal formation; and controlled cooling prevents grainy fudge. Each principle directly affects texture and shelf life for Christmas Candy Recipes.
Tempering chocolate made actionable: Use the seeding method: melt two-thirds of your chocolate to 115°F (46°C) for dark or 110°F (43°C) for milk/white, then stir in the remaining third to reduce temperature to 88–90°F (31–32°C) for dark chocolate. Test by dipping a spoon—coated chocolate should set firm within 5 minutes at room temperature. If it streaks, reheat gently to working temp and repeat. This process yields a professional finish for dipped candies and molded pieces.
Fudge basics for creamy texture: Bring the mixture to a precise 234–235°F (112–113°C) soft-ball stage and remove immediately from heat. Stir consistently to avoid sugar grain formation. Cool to 110°F (43°C) before beating to a glossy, smooth finish. This method produces dense, cuttable fudge ideal for gifting in squares wrapped in decorative foil.
To read Christmas Gift: Last-Minute Ideas That Still Impress
No-bake techniques that never fail: Combine accurate measuring with chilling. No-bake sweets like buckeyes or chocolate-dipped pretzels require firm chilling between steps. Use a shallow pan lined with parchment for even cooling. For truffles, allow ganache to set overnight for cleaner scooping and shaping.
Common mistakes and fixes: Overheating chocolate causes bloom; rapid cooling creates sugar crystals in caramel. When caramel turns grainy, add a tablespoon of corn syrup or invert sugar to inhibit recrystallization. If fudge becomes grainy, melt gently, add a tablespoon of cream, and re-beat to smooth consistency.
Equipment essentials: Invest in a reliable candy thermometer, non-reactive saucepan, silicone spatulas, and a digital kitchen scale for accuracy. These tools reduce margin of error and speed up production. For molds and presentation, use flexible silicone for easy unmolding and stainless trays for even heat distribution.
Step-by-step short demo — tempered dipped oranges: Melt 12 oz dark chocolate to 115°F, cool to 88°F, dip dried orange slices, place on parchment, sprinkle with sea salt, and set. This simple treat converts pantry items into elegant gifts with a polished chocolate shell.
Where to expand skills: Detailed tutorials and troubleshooting tips are available in curated recipe collections like seasonal candy recipes and beginner-friendly guides such as easy homemade candy recipes. Combine reading with one hands-on practice session per technique to build confidence.
Final insight: Focused practice on tempering, temperature control, and cooling yields professional-looking festive desserts that make exceptional holiday gifts. Try one technique each weekend to build a reliable candy-making workflow. 🍫
Time-Saving Holiday Treats: Quick Homemade Sweets Under $20 and Scheduling for Season
Main point: Select candy recipes that deliver high yield, low cost, and short active time to create dozens of gifts on a budget under $20 per batch. Prioritize no-bake and one-pot recipes for maximum efficiency.
To read Christmas Present Ideas: Unique Gifts They Won’t Expect
Why budget and time planning matter: Seasonal gifting often requires making multiple batches. Tracking cost-per-tin and active time avoids last-minute stress. Planning 45–60 days ahead allows for ingredient sourcing, practice runs, and assembly scheduling.
Actionable budget plan: Allocate a budget of $60–$100 for supplies that cover packaging and three to five recipes. Example breakdown: chocolate (2 lb) $12, nuts $8, powdered sugar $4, candy canes $5, tins and bags $20. This approach keeps per-gift costs around $2–$5 depending on packaging choices.
Three quick recipes under $20 that scale: first, Peppermint Bark — 20 minutes active, $8–$12 per batch making ~24 pieces. Second, No-Bake Peanut Butter Bars — 15 minutes active, $6–$9 per batch making ~16 bars. Third, Salted Chocolate Pretzel Clusters — 10 minutes active, ~$7 per batch making 30 clusters. These recipes minimize oven time and can be assembled in assembly-line fashion.
Scheduling template: Week 1: Order supplies and practice one recipe. Week 2–3: Produce shelf-stable items (bark, toffee). Week 4: Make refrigerated items and package. Week 5: Assemble gift boxes and label. This cadence allows incremental progress and avoids burnout.
Time-saving techniques: Use multiple cooling racks, silicone mats, and dedicated trays for each recipe to free counters quickly. Label trays with recipe and date to avoid mix-ups during packaging. Pre-cut parchment squares and pre-weigh ingredients into zip-top bags to reduce hands-on time when producing multiple batches.
Case example — small holiday pop-up: Maya Turner, a hypothetical weekend market vendor, produced 200 units using the above plan. By scheduling bark and toffee production two weeks prior and dedicating one evening to truffles, Maya kept costs under control and created attractive bundles that moved fast at markets. The key was batching like tasks: melting chocolate for multiple recipes in succession to save time and reduce cleanup.
Common pitfalls to avoid: Waiting until the last week to order supplies, ignoring storage needs, and skipping test batches. Each mistake increases waste and reduces gift quality. Conduct one trial run of each recipe at least two weeks in advance.
Further reading and inspiration: For cost-effective recipes and clever gift ideas, check curated rounds such as budget-friendly candy recipes and seasonal lists like homemade Christmas candy ideas. For DIY decor that complements gifting, explore easy Christmas treats.
Final insight: Use the 45–60 day plan, choose low-cost high-yield recipes, and batch tasks to produce beautiful homemade sweets under $20 per recipe — making gifting both affordable and joyful. 🕒
Creative Seasonal Gifts: Bundles, Themes, and Cottage Industry Ideas for Christmas Candy
Main point: Curate themed candy bundles and simple branding to elevate homemade seasonal gifts into memorable experiences or small business offerings. Themes increase perceived value and make packaging decisions easier.
Why themes work: Grouping candies by theme — such as Mint & Chill, Nuts & Nougat, or Classic Caramel — simplifies purchasing, speeds assembly, and appeals to different recipient preferences. Themes help when selling at markets or presenting to coworkers.
Theme examples and assembly instructions: For a Mint & Chill box, include peppermint bark, mint truffles (4 pieces), and chocolate-dipped candy canes. Line a 6×6-inch box with green tissue, add a scented pine sprig, and include a card with storage instructions. For a Nuts & Nougat tin, include salted caramels, pistachio nougat bites, and almond toffee; label allergens clearly.
Pricing and packaging for small sales: Cost out each bundle: sum ingredients, packaging, labor, and margin. Example: ingredients $4.50, packaging $1.50, labor $2.00, target price $12–$15. Offer tiered bundles (single tin, duo gift set, deluxe box) to appeal to varied buyers and increase average order value.
Branding basics for cottage sells: Create a simple logo, consistent label, and an ingredient/allergen sticker. Use social photos that showcase the product in seasonal settings; Pinterest-optimized images increase shares. Reference content and recipe lists from sites like family-favorite candy collections and practical how-tos from seasonal recipe guides to diversify offerings.
Realistic case study: Oliver Reyes, a hypothetical part-time maker, tested three bundles: office tins, hostess jars, and luxury gift boxes. Oliver tracked sales over two seasons and found luxury boxes sold out first. The lesson: invest a bit more in premium packaging and a handwritten note to justify a higher price point.
Scaling without extra stress: Automate order intake with a simple form, offer local pickup to avoid shipping complexities, and batch-produce popular items. Prepare a small printed card per bundle with ingredient list and storage advice to maintain professionalism and reduce customer questions.
Where to draw inspiration: Browse seasonal collections and market-ready ideas at resources like holiday candy galleries and curated DIY gift pages such as home candy recipe collections.
Final insight: Themed bundles and consistent branding transform simple homemade sweets into sought-after seasonal gifts and viable small business products. Start with one theme and refine based on customer feedback to scale sustainably. 🎁