Show index Hide index
- 1. Classic Wreath and Garland: Easy Christmas Door Essentials That Actually Work 🎄
- Why the wreath + garland combo wins
- Actionable setup steps
- Budget, time, and mistakes to avoid
- 2. Winter Wonderland Lighting and Outdoor Ambiance Under $50 ✨
- Lighting techniques that photograph beautifully
- Weatherproofing and durability tips
- Fast setups for renters and time-savers
- 3. Playful Candy & Character Themes to Make Your Entrance Unforgettable 🍭
- Character-driven setups that engage kids
- Balance is essential
- Practical execution and safety
- 4. Rustic Natural Design: Pinecones, Potted Evergreens, and Sustainable Outdoor Holiday Decor 🌿
- Sourcing and sustainability
- How to assemble a rustic door scene
- Durability and seasonal transitions
- 5. Quick DIY Projects and Weatherproof Tips for Stress-Free Holiday Decor 🛠️
- Three quick projects with time and cost
- Weatherproof checklist


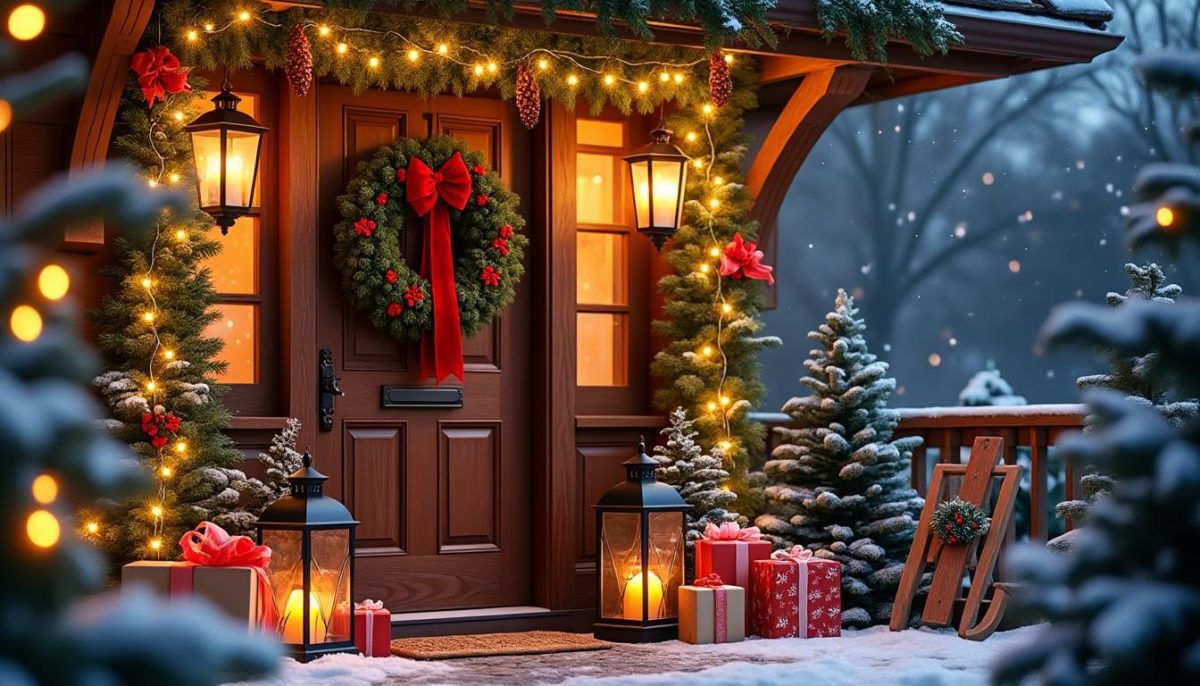
1. Classic Wreath and Garland: Easy Christmas Door Essentials That Actually Work 🎄
Answer first: The fastest way to give any entrance instant holiday decor impact is a layered approach: a bold wreath, matching garland around the frame, and two balanced pots at the base. This combination creates a focal point that reads festive from the curb and photographs well for social sharing. Pin for later! 📌
Start by choosing a wreath proportionate to your door. For a standard 36-inch door, a 22–26 inch wreath centers visually; for smaller doors, scale down to 18 inches. Purchase a pre-lit or battery-operated wreath if power access is limited. For tutorial inspiration and variations on traditional wreaths, check a practical gallery of front door decorating ideas that show lighting and color pairings.
Why the wreath + garland combo wins
Putting a wreath at eye level signals that the entry is curated. Wrapping a garland around the frame extends that visual interest and creates movement toward the interior. Use mixed textures—spruce, magnolia leaves, and faux frosted branches—to add depth. Anchor the look with two matching planters; evergreen topiaries or small potted firs work well.
Actionable setup steps
Measure the frame and cut garland slightly longer than the perimeter to allow drape. Secure garland with outdoor-rated hooks every 18–24 inches and disguise fasteners with ribbon or clusters of berries. Attach the wreath with a heavy-duty over-the-door hook or a screw-in bracket for windy climates. For a cohesive color story, echo the wreath ribbon in planter bows.
Budget, time, and mistakes to avoid
Expect to spend $25–$80 depending on quality; DIY wreath materials can be under $20 if sourced from local evergreens. Avoid overcrowding—too many ornaments on a wreath make it heavy and unphotogenic. If the door color is dark, choose lighter wreath accents; if the door is painted red or green, introduce metallics or white for contrast.
For step-by-step variations and seasonal inspiration, the seasonal roundup at The Olive Branch Nest offers styles ranging from farmhouse to modern glam. For quick DIY patterns, browse curated DIY Christmas decorations that include wreath layering techniques.
To read Christmas Living Room: Transform Your Space for the Holidays
Example case: The Morgan family used a 24-inch pre-lit wreath, a 10-foot mixed-green garland with warm white LED micro-lights, and twin galvanized planters. The setup took 45 minutes, required two hooks and a zip tie, and held through a windstorm—proving that lightweight materials plus strong anchors are the winning combo. The key insight: prioritize proportion, secure anchoring, and texture contrast for a polished result.
Final insight: A well-sized wreath and framed garland are the fastest route to an impactful Christmas Door and set the tone for the rest of the porch.
2. Winter Wonderland Lighting and Outdoor Ambiance Under $50 ✨
Answer first: Transform any entrance into an icy, elegant scene by focusing on layered lighting: micro-LED garland lights, pathway luminarias, and a spotlighted wreath. This creates depth and makes the door read as the centerpiece at dusk. Save for reference! 📌
Begin with weatherproof string lights. Battery-operated micro-LEDs typically run 8–12 hours and are affordable under $20. Wrap these tightly around garlands to emphasize shape. Add solar pathway lights spaced every 4–6 feet to guide guests to the entrance and reduce setup costs. For product hints and placement diagrams, review practical tips in the detailed guide on how to decorate entryway for Christmas.
Lighting techniques that photograph beautifully
Use warm white for cozy vibes or cool white and silver accents for a frosty look. Place a low-wattage spotlight above the frame aimed at the wreath to create a halo effect. Integrate reflective ornaments or icicle strands to catch the light and produce subtle twinkles. Lanterns with battery candles add layered glow and look great in holiday photos.
Weatherproofing and durability tips
Choose outdoor-rated cords and sealed battery packs; if using mains power, select GFCI-protected outlets and outdoor extension cords. Seal fabric bows and paper décor with weatherproof spray to prevent sogginess in rain or melting snow. Anchor lanterns with sand or gravel to prevent tipping in heavy winds.
Fast setups for renters and time-savers
For a renter-friendly approach, rely on adhesive outdoor hooks and command strips designed for exteriors, then hide the fasteners with greenery. Pre-lit faux garlands shrink setup time to 15–30 minutes. Reusable battery packs cut annual installation time and keep storage compact—labeling bins by season saves future effort, an idea expanded on storage solutions.
To read Christmas Color Palette: Best Color Schemes for Decorating
Example case: A townhouse in a city row used micro-LED garlands, two lanterns with LED candles, and a motion-sensor spotlight for security and drama. The entire display cost under $50 in materials and created a dramatic before-and-after effect that neighbors admired—demonstrating how lighting raises perceived value quickly.
Final insight: Prioritize layered, weatherproof lighting to make the entrance glow nightly without breaking the bank.
3. Playful Candy & Character Themes to Make Your Entrance Unforgettable 🍭
Answer first: A themed door—peppermint stripes, gingerbread motifs, or Santa face details—delivers high charm with low effort and is ideal for family photo ops and neighborhood contests. Bold patterns and oversized props read well from the street and attract shares on Pinterest. Pin for later! 📌
Design a candy-cane door by wrapping the door in red-and-white craft paper or outdoor vinyl. Apply diagonal stripes for motion, then attach a simple peppermint wreath at center. For gingerbread ideas with tactile appeal, layer faux frosting trim made from white foam tubing and add felt cookie ornaments. Visual examples and playful approaches can be found alongside curated visual galleries like those at creative door decor guides.
Character-driven setups that engage kids
Santa motifs can be made from lightweight materials: a large red felt panel, a sewn-on black belt with a gold-painted cardboard buckle, and a fluffy faux fur trim for the collar. Reindeer faces constructed from painted plywood circles, foam antlers, and LED nose lights create instant whimsy. These pieces are easy to store and reuse in modified form each year.
Balance is essential
When choosing a playful theme, keep one or two neutral elements—such as greenery or warm white lights—to avoid visual overload. For color-heavy themes, add grounding touches like wooden crates or burlap ribbons. For inspiration on playful, family-friendly fronts, consult approachable ideas from lifestyle roundups such as 16 playful door ideas.
Practical execution and safety
Use foam or corrugated plastic for large props to keep weight minimal and weather resistance high. Attach with exterior-rated Velcro or zip ties, and always anchor items at two points to prevent wind lift. For illuminated noses or features, choose battery LED puck lights to avoid messy wiring.
To read Christmas Tree Inspiration: Ideas for Your Perfect Holiday Tree
Example case: A suburban family created a gingerbread house door with faux frosting trim and hung oversized candy ornaments from a wrapped garland. The total build cost under $60, involved two afternoon sessions, and became a neighborhood photo backdrop. The takeaway: thematic entrances score high engagement when they balance whimsy with smart construction.
Final insight: Choose one bold theme and support it with neutral greenery and secure, lightweight props for a memorable, shareable Christmas Door.
4. Rustic Natural Design: Pinecones, Potted Evergreens, and Sustainable Outdoor Holiday Decor 🌿
Answer first: A rustic, sustainable entrance uses natural textures—pinecones, burlap, twine, and potted evergreens—to achieve timeless charm while minimizing waste. This approach is cost-effective and creates a cohesive outdoor aesthetic that extends past the door. Save for reference! 📌
Start by foraging seasonal elements: pinecones, branches, and berries can be gathered locally or purchased cheaply. Secure pinecones to garlands with floral wire and add a clear coat sealant for weather protection. Potted evergreens in ceramic or galvanized planters offer year-to-year reuse, especially when wrapped with burlap and trimmed with twine for a farmhouse look.
Sourcing and sustainability
Repurpose last year’s garlands and repurpose ornaments by repainting or upcycling. Simple DIY ornaments—dried orange slices or cinnamon-stick bundles—add scent and texture. For storage and long-term sustainability ideas, reference guides on homemade Christmas decorations and storage strategies that reduce yearly spending.
How to assemble a rustic door scene
Place two matching potted evergreens on either side of the door, flank with stacked wooden crates or a vintage sled, and drape a simple garland around the frame. Accent with pinecone clusters sprayed lightly with faux snow and tie with a satin or burlap ribbon depending on desired polish. For nighttime, add warm LED fairy lights to highlight textures.
Durability and seasonal transitions
Seal any foraged botanicals with a matte weatherproof spray to prevent rot and insect intrusion. Store finished wreaths in breathable garment bags to preserve shape and scent. Transition pieces from holiday to winter by removing a few ornaments and swapping ribbon colors; this prolongs the life of each element beyond December.
To read Pink Christmas Aesthetic: Create a Rosy Holiday Vibe
Example case: A cottage owner used reclaimed wood signs, two potted boxwoods, and a pinecone wreath to produce a cozy entrance. By sealing pinecones and storing greens properly, the homeowner reused nearly 80% of materials the following year—proving the value of sustainable selection.
Final insight: Natural materials and smart preservation create a warm, sustainable entrance that keeps improving with every holiday season.
5. Quick DIY Projects and Weatherproof Tips for Stress-Free Holiday Decor 🛠️
Answer first: Prioritize quick DIY projects—a painted wreath frame, foam snowflakes, or a wrapped-door vinyl sheet—and combine them with weatherproofing steps so the door looks finished without stress. Time your plan 45–60 days ahead for best shopping and setup. Pin for later! 📌
Choose lightweight materials: foam, outdoor-rated craft paper, and faux greenery reduce strain on fixtures. Use exterior spray adhesive and weatherproof sealants to protect paper and fabric components. For pattern templates or clever DIY concepts, consult curated idea lists like those at entryway decor ideas and practical project collections such as seasonal entryway styling.
Three quick projects with time and cost
Project one: A peppermint door wrap takes 1–2 hours and materials cost under $20. Project two: A foam snowflake cascade uses pre-cut shapes, hot glue, and fishing line—completed in 90 minutes for under $15. Project three: A rustic sled vignette using reclaimed wood and a thrifted sled costs under $40 and takes two hours to style.
Weatherproof checklist
Always choose outdoor-rated adhesives and lights. Apply a clear flood sealant on paper or painted surfaces and fasten items with screws or outdoor hooks where possible. For renter-safe options, anchor decor with removable exterior adhesive hooks rated for cold temperatures.
For pro tips on seasonal coordination and curated inspirations, review the varied themes at decor forums and trend-forward galleries like House Beautiful’s front door ideas. These resources show not just images but also construction notes for DIYers.
To read Grinch Christmas Tree: How to Create This Fun Theme
Example case: A renter executed three weekend DIY projects—snowflake mobile, peppermint wrap, and a mini-lantern trio—using removable hooks and battery lights. Total time: about 6 hours across two weekends; total cost: under $85. The display survived wind and rain because of strategic sealing and multi-point anchoring.
Final insight: Select quick, lightweight DIY projects and invest in weatherproofing to achieve a polished, durable Christmas Door without stress.