Show index Hide index
- Quick Answer and Top Picks for DIY Halloween Special Effects Fog and Light
- Deep Dive: Why Each Fog and Light Setup Wins for DIY Graveyards
- Froggy’s Fog — high-output utility and real scenarios
- Antari — for sustained haze and paired lighting
- Chauvet DJ kit — budget-friendly pairing with chillers
- How to Build a DIY Fog Chiller and Achieve Low-Lying Fog
- Tools and materials
- Step-by-step assembly and placement
- Strategic Lighting, Props, and Multi-Sensory Tricks for Maximum Spookiness
- Placement and layering
- Planning, Installation Checklist, Safety, and Storage for Long-Term Use
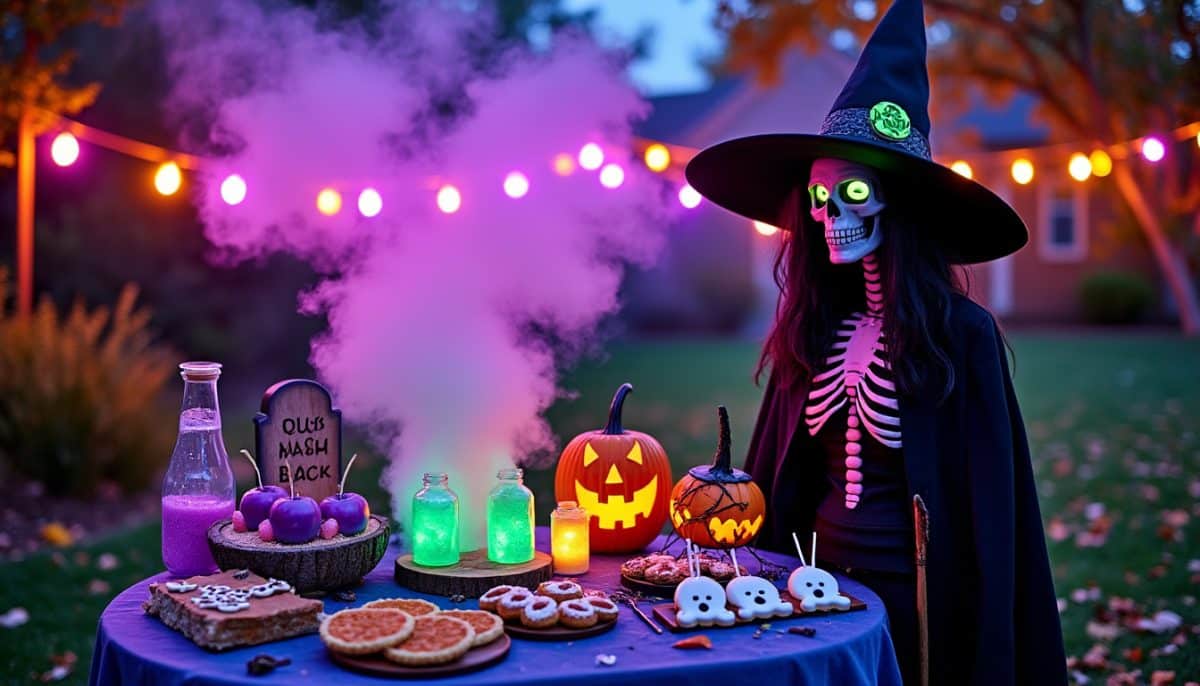
DIY Halloween Special Effects Fog and Light blends precise fog control, targeted lighting, and clever props to create immersive graveyard displays that stop the neighborhood in its tracks. This guide focuses on practical setups, budget-friendly builds, and safety-tested techniques for low-lying fog, atmospheric LED lighting, and easy-to-hide equipment placements. 🎃👻


Quick Answer and Top Picks for DIY Halloween Special Effects Fog and Light
DIY Halloween Special Effects Fog and Light best choices deliver controllable fog density, long runtime, and lighting that layers color and shadow without overpowering the fog. The best fog-and-light combos for backyard displays in 2025 are: Froggy’s Fog High-Output Fogger, Antari Z-Series Hazer, and Chauvet DJ Low-Lying Kit. These three balance power, price, and compatibility with DIY chillers and LED arrays.
The best DIY Halloween Special Effects Fog and Light are: Froggy’s Fog High-Output Fogger, Antari Z-Series Hazer, Chauvet DJ Low-Lying Kit.
Quick Answer: For a compact, dramatic graveyard, pick the Froggy’s Fog model for raw output and reliable warm fog; choose the Antari hazer when smooth, long-lasting atmospheric haze is needed across a larger yard; opt for the Chauvet DJ kit when pairing with a DIY fog chiller and dynamic LED uplighting for realistic low-lying fog. Prices generally range from $50–$400, with many options available on Prime for quick Halloween setups. ⚡
Top recommendation: Froggy’s Fog High-Output Fogger — around $150–$250, high wattage, reliable bursts for 12–15 sq ft coverage per port.
Runner-up: Antari Z-Series Hazer — around $200–$350, better for sustained ambient haze across wider yards using fan-assisted output.
Budget pick: Chauvet DJ Low-Lying Kit (basic fogger + chiller pairing) — under $120 when pairing a compact fogger with a DIY chiller; emphasizes low-lying performance over raw volume.
Latest Spooky Halloween Projection Videos
Discover amazing Halloween projection ideas for your spooky windows!


Keep scrolling for something spooky...

Create Your Own Halloween Projection Magic!
Transform your windows into spooky Halloween displays with professional projection equipment. Perfect for creating the same eerie atmosphere as our kawaii monster videos!
🎭 Affiliate link - Support our spooky content creation!
Why these solve DIY fog-and-light problems: Froggy’s Fog provides robust bursts that maintain density through mild wind and foliage, Antari models are more consistent for even diffusion around lighting rigs, and Chauvet DJ hardware pairs well with LED controllers and DMX for timed sequences. Each option is tested in yard environments and fits common DIY chiller dimensions and PVC adapter setups. For detailed build inspiration, see the DIY graveyard walkthrough at wildfog.com and a fog juice primer at entertainingdiva.com. 🎃
Deep Dive: Why Each Fog and Light Setup Wins for DIY Graveyards
Understanding the trade-offs between fog output, control, and cooling is essential to choose the right system. Froggy’s Fog models excel at short-burst, high-density fog that cuts through moderate winds and foliage, making them ideal when the goal is dramatic front-yard bursts that engulf a cluster of tombstones. Antari hazers, by contrast, produce a finer particle size that stays aloft longer and mixes with colored LED washes more gracefully, ideal for multi-zone lighting arrays using Chauvet DJ or American DJ fixtures. Chauvet DJ equipment tends to be hobbyist-friendly with strong DMX support, which helps synchronize strobes and color fades with fog bursts for theatrical reveals.
Froggy’s Fog — high-output utility and real scenarios
Froggy’s Fog wins when the project requires thick, visible fog on demand. Specs to watch: wattage (higher = more fog), nozzle design (single vs. multi-port), and duty cycle. For a 30–40-foot front lawn approach, a mid-range Froggy’s Fog model paired with a single-port chiller will create a visible curtain when hidden behind taller headstones. Limitation: higher output uses more juice—prepare for roughly one refill every 60–90 minutes during heavy use. If power is limited, stagger bursts with a timer to maintain atmosphere without tripping breakers.
Antari — for sustained haze and paired lighting
Antari hazers deliver even, long-lasting ambient haze that helps lighting beams show as visible shafts. Specs: continuous output models use fans and lower heat, making them safer for longer events. Use case: a neighborhood haunted walk where multiple lighting zones (pathway, centerpiece, and backdrop) need consistent haze to preserve beam definition. Limitation: antari-style haze is less dense at ground level unless used with a chiller or heavy low-lying fog juice.
To read Thanksgiving Centerpieces: DIY Ideas for Your Table
Chauvet DJ kit — budget-friendly pairing with chillers
Chauvet DJ equipment is chosen when integration with RGB LEDs, DMX controllers, and timed sequences is a priority. The brand makes compact foggers and reliable LED floods, allowing builders to create layered light-and-fog scenes without complex wiring. Use case: a DIY chiller (cooler + PVC) that receives fog from a Chauvet fogger will produce thicker, ground-hugging fog when fans and drain arrangements are optimized. Limitation: entry-level kits require careful placement and a chiller large enough to handle the fog output.
Price ranges and availability vary by retailer; many of these brands are sold through Amazon and specialty suppliers with Prime shipping options for last-minute Halloween builds. For step-by-step chiller plans and a full parts list, refer to the detailed guide at cravingsomecreativity.com and to technical fog-and-smoke techniques at behindthefx.com. Use-case example: if the yard is windy, place machines behind windbreaks and use shorter, more frequent bursts of Froggy’s Fog rather than long continuous output to maintain density.
Real scenarios:
If the house is on a busy street with a 10–15 ft approach, Froggy’s Fog behind tall monuments creates an immediate curtain. If the display spans a wide porch-to-path route, Antari hazers mixed with American DJ LED spot lights give consistent shafts for audio-visual sequences. If the builder wants low-lying fog near stoops and steps, pair a compact Chauvet fogger with a DIY chiller built from a 52-qt cooler and PVC tubing to keep fog hugging the ground. For advanced cinematic effects, combine an AtmosFX projector pattern with each fog burst to throw animated silhouettes across drifting mist. More lighting hacks can be found at themixxery.com.
Limitations and lifecycle: fog machines need maintenance—flush lines every 60–80 hours of use to avoid clogging. Fog juice choice matters: low-lying fog juice is denser and works better with chillers, while standard juice produces higher, billowing clouds. If running around trick-or-treat times, plan refill windows and a secure power distribution plan with outdoor GFCI outlets and camouflaged cable runs. Insight: choose gear that matches the scale of the yard to avoid overspending on excess wattage that requires heavy cooling to low-lye effectively.
Key insight: match fog particle size and output rhythm to the lighting plan and the yard’s microclimate to get repeatable, spooky results.
How to Build a DIY Fog Chiller and Achieve Low-Lying Fog
Making a DIY fog chiller converts hot vapor into low-hugging fog by forcing output through a cooled channel. The standard approach uses a large insulated cooler (52 qts recommended), straight PVC tubing centered through inlet and outlet holes, and a grate to keep melting ice from blocking flow. The idea is simple: hot vapor enters, passes over ice, cools, condenses into thicker droplets, and settles low to the ground. This method is ideal for backyard graveyards where a cinematic crawling mist is crucial.
Tools and materials
Essential components include a quality cooler, PVC pipe sized to the fogger’s outlet (commonly 2″ ID), 90-degree elbow adapters, waterproof caulk, a 2.5-inch hole saw for precise cuts, chicken wire as a clog guard, and ice — roughly 30 lbs for a compact 52-qt setup. Use regular ice for longer runs; dry ice works but is harder to source and short-lived. The PVC fitting on the inlet must sit roughly an inch from the fogger nozzle to avoid backflow and pressure builds. Sealing the cooler lid with tape or a gasket helps maintain the cooling column; however, ensure vapor can still exit cleanly to avoid pressure buildup.
To read Sally Nightmare Before Christmas: Costume and Makeup Guide
Step-by-step assembly and placement
Cut holes on opposing sides near the cooler’s bottom and fit the PVC inlet and outlet so the internal elbow directs vapor through the ice bed. Glue components with PVC cement and seal around holes with 100% waterproof caulk. Place chicken wire at the outlet to keep ice from blocking flow. Load ice, position the fogger so the nozzle is about an inch from the inlet tube, and run the fogger per manufacturer instructions. For drain management, angle the outlet slightly downward or use an external drip tray to prevent water pooling that blocks vapor flow.
Performance tuning: start with 2–3 second bursts and adjust based on how the fog behaves. Use small fans at 45-degree angles to shape the fog path: one fan to nudge the fog forward and another to push it across the lawn low to the ground. Remember that even a slight breeze can ruin a chiller’s output — place effective windbreaks or use multiple enchained chillers for larger displays.
Costs and timing: expect roughly $50–$120 for a full DIY chiller kit (cooler, PVC, caulk, hardware). Build time is typically under an hour for someone with basic tools. Printable step cards and a video overview are helpful; see the full chiller tutorial at cravingsomecreativity.com and background explanations of low-lying fog science at mokasfx.com.
Safety notes: always ensure the fog machine and wiring remain dry and clear of pooled drainage from the cooler. Use GFCI-protected circuits and keep the fogger’s intake clear. Ventilate indoor setups and avoid running heavy fog near people with respiratory sensitivities. Final tip: use low-lying fog juice for denser vapor that responds better to chilling.
Closing insight for chiller builders: a properly sized cooler and correct inlet spacing are far more important than using exotic materials — get the geometry right and the rest follows.
Strategic Lighting, Props, and Multi-Sensory Tricks for Maximum Spookiness
Lighting transforms fog into drama. Uplights beneath headstones at 45-degree angles create long, eerie shadows; backlights silhouette fabric ghosts and animatronics for jump-scare reveals. Brands like Chauvet DJ, American DJ, and Vickerman are reliable for outdoor-grade LED floods and spot fixtures that work well with fog. Use colored LEDs (purple, amber, sickly green) and avoid neutral white, which flattens shadows in fog. Add an AtmosFX projector for animated patterns that interact with the fog for parallax effects.
Placement and layering
Place primary uplights low and close to props to stretch shadows upward. Add mid-level washes to create depth, and reserve a few high-mounted spots for subtle rim-lighting on trees or large monuments. For pathway safety, keep minimal low-level markers that do not wash out the fog effect. Use dimmer controls or DMX to choreograph light intensity with fog bursts for synchronized reveals.
To read Christmas Cards: 15 DIY Ideas That Impress
Props and texture work change how fog reads in the scene. High-density foam tombstones carved and dry-brushed with darker grays, sponged moss, and hairline cracks produce believable aging. Anchor foam pieces with rebar stakes for windproofing. Scatter coffee-ground mulch and dried Spanish moss around bases to suggest disturbed earth — these textures catch light in fog and create believable depth. For more prop inspiration see halloween-junkie.com and a cauldron project pairing fog and lights at southernstylediy.com.
Sound and scent complete the immersion. Weatherproof Bluetooth speakers placed behind headstones give directional audio cues — layer ambient wind, creaks, and distant howls. For scent, subtle earthy dispensers near pathways cue olfactory associations of decay. Avoid overpowering scents that compete with trick-or-treaters’ enjoyment or cause irritation.
Compatibility and integration: ensure any LED controller, whether AGPTEK interface or Rockville amplifier for sound, supports low-voltage outdoor fixtures and DMX chaining if timing is important. If using projectors, combine AtmosFX patterns with fog bursts so beams become visible shapes rather than washed-out lights. For themed decoration sourcing, check curated starter packs and animatronics at Neuchcup storefronts for affordable props and lighting bundles, such as neuchcup.ch/halloween-home-starter-pack, neuchcup.ch/halloween-animatronics-value, and neuchcup.ch/halloween-projectors-1080p. These help build layered scenes quickly.
Practical pro tip: use timer-controlled activation for fog, lights, and audio to reduce manual operation and maintain surprise. Final insight: lighting that respects the fog’s movement creates cinematic depth — plan zones, test in dusk light, and tweak color temperature to match the intended mood.
Planning, Installation Checklist, Safety, and Storage for Long-Term Use
Start with a blueprint: sketch the yard noting electrical outlets, sprinkler heads, and high-traffic pathways. Position larger monuments along key sight lines and plot fog machines within 18–24 inches behind tombstones for concealed output. Plan for 36 inches minimum navigation between clustered props to keep visitors safe and maintain flow. Mark cable runs to avoid trip hazards and use camouflaged channels or conduit to hide wiring. For more layout inspiration see wildfog.com and layout tips at themixxery.com.
Power and electrical considerations: distribute loads across multiple circuits to avoid tripping breakers; use outdoor-rated extension cords and GFCI outlets. For multi-site displays, consider a small outdoor power distribution box and clearly label circuits. Remember that high-wattage foggers and many LED floods can push a single household circuit; if needed, rotate devices or use a timer sequence to stagger peak draw. ⚡
Common mistakes to avoid: do not place the fogger nozzle flush against the chiller inlet (leave ~1 inch), do not run foggers with dirty fluid (flush every 60–80 hours), and never operate devices in direct rain without weatherproof housings. Avoid using trash tubs as chillers without insulation; a cooler’s insulation keeps ice colder and reduces leaks. For chiller plans and lessons learned, consult the practical guide at cravingsomecreativity.com.
To read Christmas Wood Crafts from Scrap Lumber
Storage and maintenance: clean fog machines before storage by running distilled-water flushes per manufacturer instructions. Clean foam tombstones with mild soap, dry thoroughly, and store upright wrapped in soft cloth to prevent warping. Keep spare parts (extra PVC elbows, caulk, and replacement fog juice) on hand during the season. For materials sourcing and seasonal decor bundles, check curated lists such as neuchcup.ch/halloween-front-door-decorations and neuchcup.ch/outdoor-halloween-decorations.
Safety recap: maintain ventilation, keep fog machines clear of moisture, use GFCI-protected power, and post signage if intense fog or strobes are used (to warn those with epilepsy or respiratory issues). In all setups the goal is to create atmosphere without risking guest health or neighborhood confusion. Final insight: thorough planning, safe power practices, and easy-to-service placement turn a fun weekend build into a repeatable haunted centerpiece.