Show index Hide index
Is your garage more of a chaotic catch-all than a useful space? Overstuffed shelves, random bins, and scattered tools can make finding anything a challenge—and forget parking your car inside! Yet, transforming this cluttered mess into an organized haven doesn’t require a huge budget or a lengthy project. With simple, practical steps, homeowners can reclaim their garage in just a weekend. From clever storage zones to smart shelving solutions by brands like Gladiator and Rubbermaid, these quick garage organization tips promise lasting results. Whether tackling a small garage or a sprawling workspace, these DIY strategies ensure everything has a place, improving accessibility and safety without breaking the bank or needing special tools. Get ready to turn that cluttered garage into a streamlined, functional space that truly sticks! 🚗🛠️
Discover how to sort, store, and maintain your belongings with ease—because a beautifully organized garage is within reach for every homeowner wanting a clutter-free lifestyle.
Maximize Space with Stackable Storage Bins
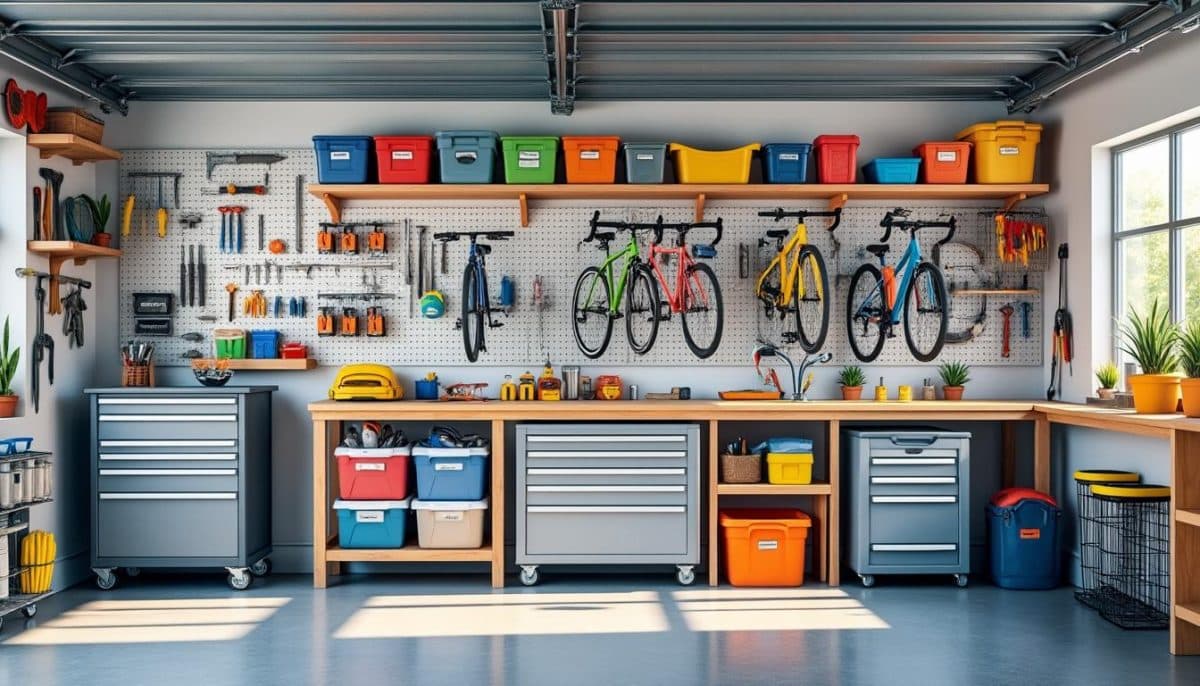
Start your garage makeover by investing in stackable storage bins from Rubbermaid and Sterilite. These budget-friendly containers work wonders by grouping similar items—think holiday decorations, tools, or sports gear—into clear, labeled bins for instant visibility. This method doubles your storage potential by making the most of vertical space.
Place heavier bins like off-season tools at the bottom and lighter, frequently accessed items on top. Installing durable shelving units from Gladiator or Seville Classics complements the bins perfectly, keeping floors clear and improving accessibility. These bins withstand garage conditions and protect contents from dust or moisture.
Time: Prep 0.5 hours | Organize 1 hour | Total 1.5 hours
Cost: Under $100
Skill: Beginner
Tools Needed: Drill, level, basic hardware
Weight Capacity: Up to 50 lbs per shelf
Pin for your garage makeover! 📌
To read Christmas Wish List: Template and Organization Tips
Create Organized Zones for Easy Access
Segment your garage into dedicated zones to enhance function and streamline daily routines. Allocate areas for gardening, tools, sports equipment, and seasonal items. For example, position frequently used tools and power tools from DeWalt and Craftsman near your workbench, while storing bulky or rarely used gear on SafeRacks ceiling shelves.
This zoning method reduces time spent searching and prevents clutter buildup by making it obvious where things belong. Use wall-mounted pegboards from Wall Control to corral hand tools visibly, enhancing accessibility for DIY beginners and seasoned pros alike.
Time: Prep 1 hour | Implementation 1 hour | Total 2 hours
Cost: Under $80
Skill: Beginner to Intermediate
Tools Needed: Drill, level, pegboard hardware
Weight Capacity: Hooks hold up to 50 lbs
Save for weekend projects! 🔖
Install Heavy-Duty Wall and Ceiling Storage
Free your floors by mounting sturdy wall shelves and ceiling racks using systems like Gladiator gear tracks and SafeRacks ceiling solutions. These options handle heavy items such as bike racks or tool cabinets, making full use of vertical space without overcrowding.
Overhead storage is especially valuable for seasonal decorations or rarely accessed equipment. Remember to adhere strictly to weight limits—SafeRacks, for example, supports up to 600 lbs safely. Use a level and drill for proper, secure installation to ensure durability and safety around kids and pets.
Time: Prep 1 hour | Install 3 hours | Total 4 hours
Cost: Under $100
Skill: Intermediate
Tools Needed: Drill, level, stud finder, hardware kit
Weight Capacity: Up to 600 lbs ceiling racks
To read Christmas Door: Entry Makeover Ideas for Maximum Impact
Pin for instant garage storage inspiration! 📌
Use Rolling Carts for Mobile Workspace Efficiency
Incorporate rolling carts by Seville Classics or Husky to create a mobile and flexible work area. These carts keep your most-used tools and supplies within reach and can be rolled near repair spots or stowed away easily to save space.
Perfect for homeowners who multitask in the garage, rolling carts reduce clutter and speed up projects while safeguarding your favorite Kobalt and DeWalt tools. Opt for models with multiple tiers and locking wheels for stability during work.
Time: Ready to use immediately after purchase
Cost: Around $100 or less
Skill: Beginner
Tools Needed: Assembly screwdriver
Weight Capacity: Up to 100 lbs per shelf
Save this quick idea for your next garage upgrade! 💡
Label Everything for Effortless Organization
Labels transform a cluttered space into an efficient system. Utilize label makers or pre-printed tags to name bins, shelves, and zones clearly. This enhances family participation and reduces time wasted searching.
Labels work wonders, especially on clear Rubbermaid containers or boxes. A DYMO or similar device simplifies labeling and lasts through garage conditions. Clear, bold fonts make identification quick and stress-free—perfect for busy families and DIY beginners.
To read Christmas Decorations That Double as Storage Solutions
Time: Labeling a full garage can take 1-2 hours
Cost: Under $50 for a label maker
Skill: Beginner
Tools Needed: Label maker or permanent markers
Weight Capacity: N/A (applies to organization)
Pin this easy tip for long-term garage success! 📌
Keeping frequently used gear accessible saves time and frustration—no more digging through bins or climbing for overhead storage. Position everyday items at convenient heights, using hooks from Rubbermaid and Wall Control to hang bikes or long-handled tools.
Following these simple, budget-friendly, and quick-to-implement tips leads to a garage that not only looks inviting but stays organized through time. Check out additional inspiration and practical hacks at Styled Havens, Garage Adviser, and Mommy Overwork.