Show index Hide index
When your garage turns into a chaotic zone where tools and supplies are scattered everywhere, it’s time for a change. Transforming this space doesn’t require expensive overhauls or professional help—simple, budget-friendly DIY toolbox ideas can make your garage a model of order and efficiency. Harnessing the latest storage trends and trusted brands like Gladiator, Husky, and Stanley, homeowners and DIY beginners alike can reclaim their garage in just a weekend. With clever tools such as drill, level, and basic hardware, you’ll create a system that keeps every wrench, screwdriver, and gadget right where it belongs, ready when needed. Say goodbye to endless searching and hello to instant organization and ample storage, all under $100 and without needing special skills. ✨🔧
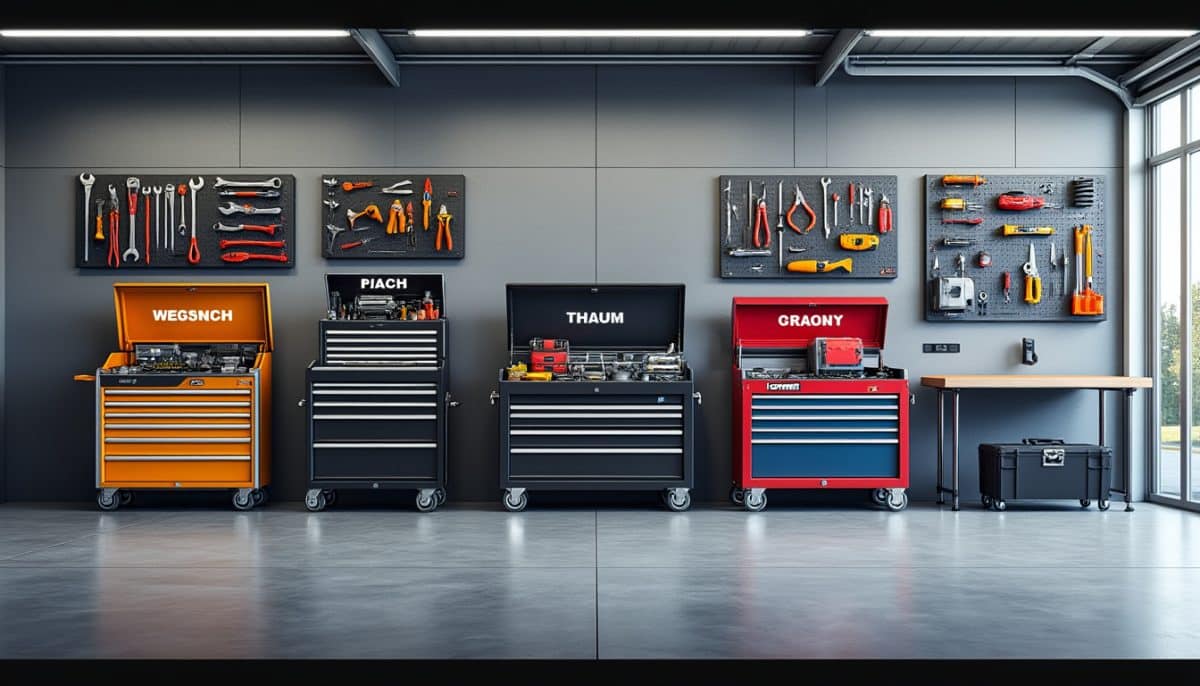
1. Modular Garage Toolbox with Stackable Bins for Quick Sorting
Why it works: Stackable bins from brands like Rubbermaid and Keter provide an adaptable system that efficiently separates tools by category—no more mixing screws with power tools. This modular setup frees up floor space while offering instant visual access to what you need.
Time: Prep 1 hour | Build 1 hour | Total 2 hours
Cost: Under $80 | Skill: Beginner
Materials: Plastic stackable bins, label maker, drill, level
- Choose durable bins with snap lids for dust protection and secure stacking.
- Use the label maker or pre-made labels to clearly mark each bin’s contents.
- Assemble the bins in a designated corner or on a sturdy shelf using a level to keep everything balanced.
Make It Work: For tighter budgets, swap high-end bins with affordable brands like WEN or Seville Classics. Adjust the number of bins depending on your tool quantity, and beginners can follow easy tutorials for labeling and stacking effectively.
To read Christmas Window Painting: DIY Tutorial and Ideas
2. Wall-Mounted Pegboard System for Intuitive Tool Access
Why it works: A wall-mounted pegboard system featuring robust hooks from Craftsman or Homak creates a vertical toolbox, keeping every tool visible and within reach. It’s perfect for garages of any size and adds an element of workshop professionalism at a budget-friendly price.
Time: Prep 0.5 hour | Build 1.5 hours | Total 2 hours
Cost: Under $70 | Skill: Beginner
Materials: Pegboard panel, assorted hooks, drywall anchors, drill, level
- Measure and mark the wall area, then securely mount the pegboard with drywall anchors.
- Arrange hooks based on tool sizes and shapes for efficient layout.
- Regularly move and adjust hooks as your tool collection evolves.
Make It Work: Opt for metal pegboards for durability if your lifestyle requires heavier tools, or plastic for an easy, rust-free alternative. Skill-level adjustments include enlisting help for wall mounting or simply leaning the board against a wall for starter projects.
3. Rolling Tool Cart to Keep Tools Mobile and Accessible
Why it works: Incorporating a rolling toolbox like those from DeWalt or Husky ensures your toolkit moves with your projects. This mobile option keeps your tools sorted and easy to transport across your garage workspace, perfect for busy weekend warriors.
Time: Prep 0.5 hour | Build 1 hour | Total 1.5 hours
To read Thanksgiving Centerpieces: DIY Ideas for Your Table
Cost: Under $100 | Skill: Intermediate
Materials: Rolling tool chest, basic hardware, drill
- Choose a cart with multiple drawers and compartments for ultimate sorting.
- Assemble wheels and check locking mechanisms for safety.
- Organize tools by frequency of use in each drawer.
Make It Work: For smaller budgets, consider refurbished or basic models. Intermediate DIY skills help with assembly and customization; beginners can seek guided videos for step-by-step support.
4. DIY Toolbox Partition Inserts for Personalized Sorting
Why it works: Create custom divider inserts using inexpensive materials to separate tools within existing drawers or boxes. This simple build is perfect for maximizing small spaces and keeping tiny parts from becoming a tangled mess.
Time: Prep 0.5 hour | Build 1 hour | Total 1.5 hours
Cost: Under $20 | Skill: Beginner
Materials: Foam board or plastic sheets, utility knife, adhesive, ruler
To read Christmas Cards: 15 DIY Ideas That Impress
- Measure drawers accurately before cutting partitions.
- Use adhesive or Velcro strips to secure dividers.
- Label each compartment for quick identification.
Make It Work: Use recycled materials like cardboard for ultra-budget projects. Adjust partition sizes based on tool dimensions, and beginners can rely on simple templates available online.
5. Magnetic Tool Holders for Compact Wall Organization
Why it works: Magnetic strips from brands like Stanley or Gladiator are quick fixes for frequently used metal hand tools. These holders free up drawer space and make tools instantly visible and accessible while adding a sleek modern touch.
Time: Prep 0.5 hour | Build 0.5 hour | Total 1 hour
Cost: Under $30 | Skill: Beginner
Materials: Magnetic tool strip, mounting hardware, drill, level
- Choose a sturdy wall area for mounting, safe from moisture.
- Use a level to ensure a straight installation for neatness and safety.
- Arrange tools by type or size for intuitive reach.
Make It Work: Magnetic holders come in various lengths to fit any garage wall. Ideal for beginners due to simple installation; just be mindful of heavy tools exceeding the magnet strength—check capacity labels.
Ready to regain control of your garage toolbox? These practical ideas blend top brands like DeWalt, Husky, and Craftsman with smart, DIY-friendly approaches that fit any budget. Save this guide and pin it to jumpstart your garage makeover this weekend! 🚗🔨