Show index Hide index
- 1. Sturdy Metal Pegboard System for Ultimate Tool Access
- 2. Modular Slatwall Panels for Customizable Storage
- 3. DIY Hanging Rail Systems for Adjustable Versatility
- 4. Overhead Ceiling Storage to Free Unused Space
- 5. Wall-Mounted Bike Racks to Clear Floor Space
- Transforming Workbench Storage with Backboard Rails
Your garage might be bursting at the seams with tools, sports gear, and random clutter, leaving you no room for your car or weekend projects. The good news? Maximizing vertical space with smart wall organization can transform that chaos into a functional, spacious zone virtually overnight. From sturdy pegboards to versatile slatwalls, these budget-friendly and easy DIY solutions work wonders for every garage size, making it easier for homeowners and DIY beginners alike to reclaim valuable floor space and keep everything at arm’s reach.
1. Sturdy Metal Pegboard System for Ultimate Tool Access
Why it works: Durable metal pegboards like those from Wall Control and Pegboard System brands withstand heavy tools and maintain their shape even under constant use. Hanging tools visibly at eye level reduces search time and keeps your workbench clutter-free.
Time: Prep 1 hour | Install 2 hours | Total 3 hours
Cost: Under $70 | Skill: Beginner
Materials: Metal pegboard panel, heavy-duty hooks, anchors, drill, level
- Measure wall studs to securely mount pegboard
- Drill pilot holes and use anchors for heavy loads (up to 50 lbs per hook)
- Arrange hooks for tools you use most often
- Ensure all hardware is tightened and level
Make It Work: Adapt sizes by cutting the panel or mounting multiple smaller units. Use budget options like DIY kits to keep costs low. Perfect for homeowners new to garage organization.
To read Christmas Door: Entry Makeover Ideas for Maximum Impact
2. Modular Slatwall Panels for Customizable Storage
Why it works: Brands like Flow Wall and Proslat offer PVC slatwall systems that let you reposition shelves, baskets, and hooks easily. This flexibility means your storage evolves with your needs without drilling new holes.
Time: Prep 1 hour | Install 3 hours | Total 4 hours
Cost: Around $100 | Skill: Intermediate
Materials: Slatwall panels, mounting brackets, hooks, drill, level, screws
- Attach panels securely to wall studs for maximum weight capacity (up to 100 lbs per shelf)
- Customize your layout with modular accessories
- Use labeled bins to separate small parts efficiently
- Double-check alignment with a level before final tightening
Make It Work: Split this project into phases for smaller budgets or start with one wall and expand. Perfect for larger garages needing versatile zones like workshop and sports gear storage. See this style in action at BirchTree Organizing.
3. DIY Hanging Rail Systems for Adjustable Versatility
Why it works: Hanging rails from brands like Gladiator and Rubbermaid allow quick rearrangements to accommodate changing storage needs—ideal for families and crafters who constantly switch tools and gear.
Time: Prep 0.5 hour | Install 1.5 hours | Total 2 hours
To read Dehumidifiers Halloween Decoration Preservation
Cost: Under $80 | Skill: Beginner
Materials: Rail system kit, brackets, screws, drill, level
- Locate and mark studs on your garage wall
- Secure rails firmly for weight up to 75 lbs
- Install accessories like baskets or tool holders along the rails
- Wear safety glasses and use a stud finder for precise mounting
Make It Work: Combine with overhead storage like SafeRacks ceiling racks for seasonal gear. This simple build suits all skill levels and works beautifully in tighter or multi-use garages.
4. Overhead Ceiling Storage to Free Unused Space
Why it works: Utilizing ceiling space with sturdy racks — like those from SafeRacks — declutters floors and keeps bulky, infrequently used items off the ground.
Time: Prep 1 hour | Install 4 hours | Total 5 hours
Cost: Under $100 | Skill: Intermediate
Materials: Ceiling racks, anchors, drill, level, ladder
To read 8 Easy Garage Projects That Add Serious Storage
- Secure racks to ceiling joists capable of holding heavy seasonal items (up to 200 lbs)
- Balance loads evenly to ensure safety
- Use plastic totes with lids to protect stored items from dust
- Wear protective gloves and eye protection during installation
Make It Work: Perfect for storing holiday decorations, camping gear, or less-used sports equipment. Check creative solutions at Inventive Garage.
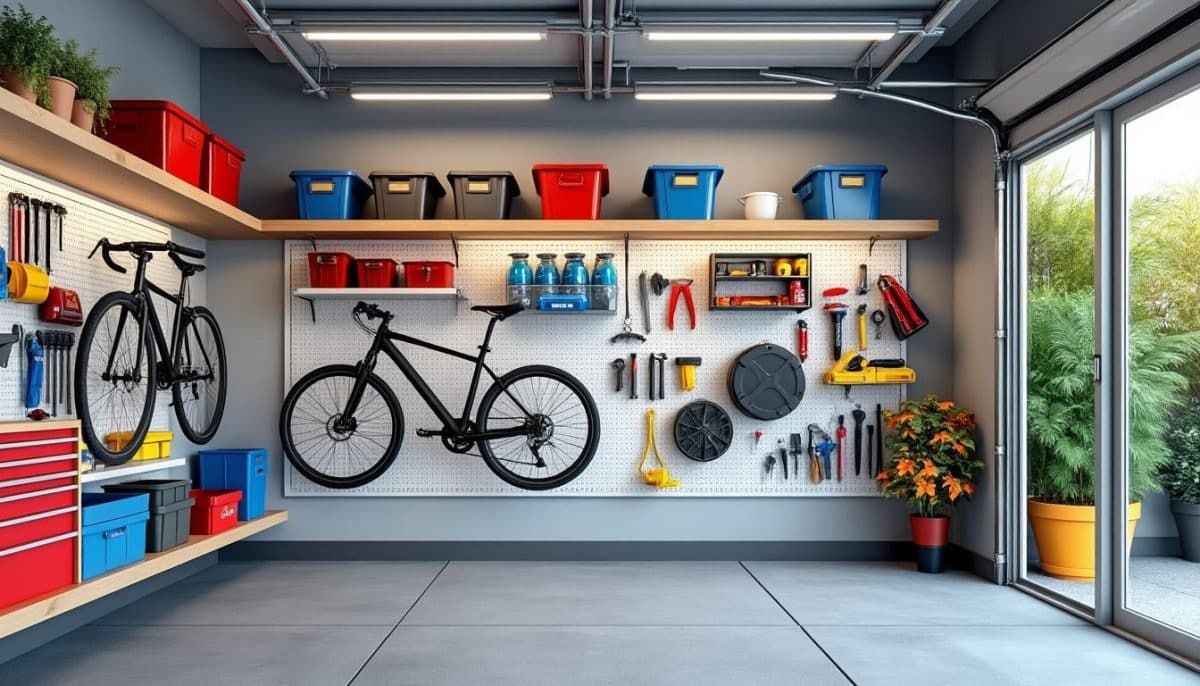
5. Wall-Mounted Bike Racks to Clear Floor Space
Why it works: Vertical bike racks from Husky and Fleximounts lift bicycles off the floor, creating extra room and reducing clutter. Padded hooks ensure your bike frames stay scratch-free.
Time: Prep 0.5 hour | Install 1 hour | Total 1.5 hours
Cost: Under $60 | Skill: Beginner
Materials: Bike rack kit, brackets, screws, drill, stud finder
- Identify studs to ensure secure mounting for safety
- Maintain at least 12 inches clearance between bike and wall
- Frequently check mounting brackets for wear and tighten if needed
- Use a level to keep racks perfectly horizontal
Make It Work: Ideal for families with multiple bikes and limited space. Pair with wall baskets to store helmets and accessories conveniently. Discover more ideas on Garage Adviser.
Transforming Workbench Storage with Backboard Rails
Upgrading your workbench with bench rails keeps tools and equipment visible and within easy reach while maintaining an uncluttered workspace. Systems from NewAge Products and Proslat add both function and style.
To read 9 Garage Organization That Handles Everything
Prep and install in under 3 hours, costs under $80, and fits well in DIY workshops or hobby corners. Use drill, level, and basic hardware. Customize rails with hooks and shelves tailored to tasks.