Show index Hide index
Is your kitchen overflowing with clutter and disorganized cabinets making meal prep a challenge? Whether you have a compact space or a busy household, transforming your kitchen into an efficient haven is easier than you think. With smart DIY kitchen organization projects, anyone can maximize storage, slash clutter, and bring instant order—all without breaking the bank or needing specialized skills. From clever pull-out shelves to stylish spice racks, these projects harness simple materials like drawer organizers, shelf risers, and containers from trusted brands like IKEA and The Container Store, ensuring functionality and style unite. Prepare to upgrade your kitchen storage in a weekend, relieve daily chaos, and enjoy cooking like never before! 🍽️✨
5 Easy DIY Pull-Out Cabinet Shelves for Instant Storage Boost
Deep base cabinets often hide pots and pans in inaccessible corners, cluttering space and wasting storage potential. Pull-out cabinet shelves make every inch reachable—perfect for small kitchens looking to double their storage.
- Why it works: Enhances cabinet accessibility, reduces bending, and keeps cookware visible and organized.
- Time: Prep 30 min | Install 90 min | Total 2 hours
- Cost: Under $50 | Skill: Intermediate (basic pocket hole screwing)
Materials: Wood boards, drawer slides (from mDesign or ClosetMaid), screws, and a drill.
Quick Steps: Measure cabinet depth and width precisely, cut boards accordingly, attach slides inside cabinet, mount shelves onto slides, then slide in and out smoothly. Weight capacity typically around 50 lbs suitable for cookware.
Make it Work: Adjust shelf size to cabinet dimensions; for a budget-friendly alternative, repurpose shelf risers or sturdy crates. For renters, ensure easy removal without damage.
Pin for your kitchen makeover! 🛠️
To read Christmas Pattern: Seamless Designs for DIY Projects
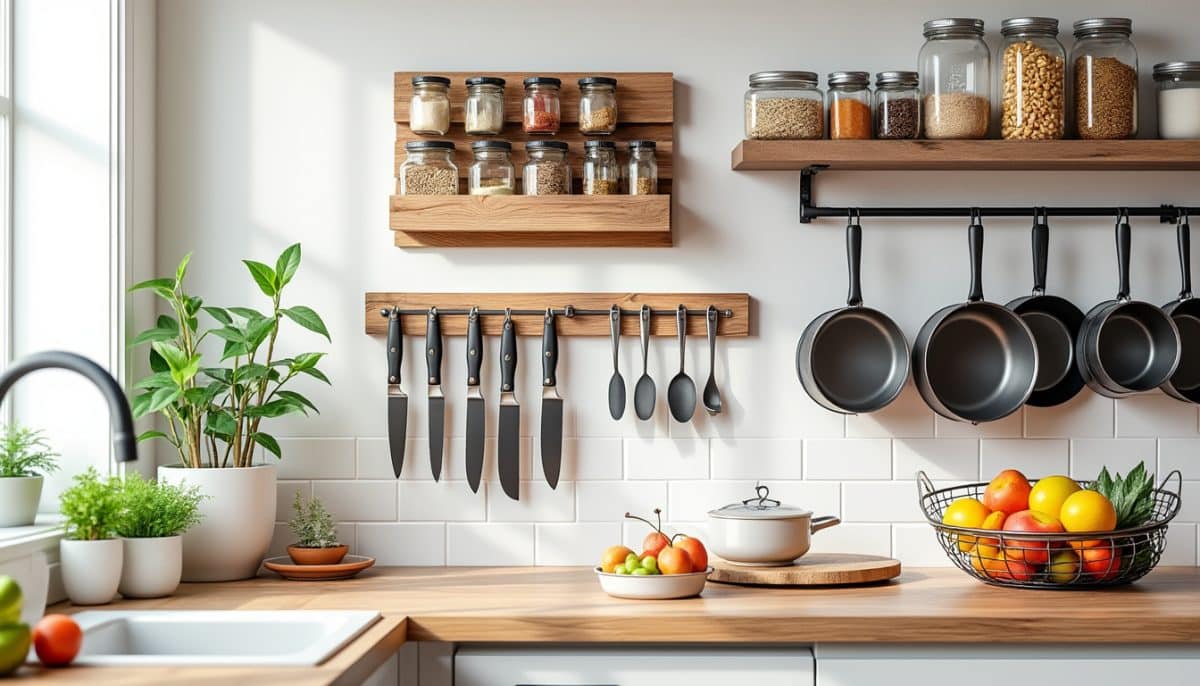
4 Clever DIY Spice Racks Using Everyday Items
Spices elevate every dish, but shuffling through dozens of jars can slow you down. A well-designed spice rack not only saves space but spices up kitchen aesthetics, especially in small homes.
- Why it works: Keeps spices visible and accessible while freeing up cabinet space.
- Time: Prep 20 min | Assemble 40 min | Total 1 hour
- Cost: Under $25 | Skill: Easy
Materials: Wooden crates or napkin holders (available at IKEA or The Container Store), paint, nails, and wall hooks.
Quick Steps: Paint crates if desired, fix hooks on wall, and mount crates to hold jars. Label jars with reusable chalkboard stickers from Honey-Can-Do for easy identification.
Make it Work: Use wall space creatively; for renters, opt for removable adhesive hooks. Customize rack size to spice jar dimensions.
Save for your weekend project! 🌿
3 Quick DIY Magnetic Jar Organizers Under Cabinets
Look up: the often-neglected underside of cabinets is prime real estate for decluttering! Magnetic jar organizers harness metal lids to store herbs, nuts, or dry goods, perfect for tight kitchens.
- Why it works: Utilizes unused space, declutters counters, and keeps small essentials at arm’s reach.
- Time: Prep 15 min | Install 15 min | Total 30 min
- Cost: Under $20 | Skill: Beginner
Materials: Strong magnetic strips (Joseph Joseph or Simplehuman quality), repurposed glass jars with metal lids, glue.
To read Christmas Crafts DIY: Handmade Projects Tutorial
Quick Steps: Attach magnetic strip underneath cabinet, glue magnets to jar lids, and place jars on strip. Ideal weight limit about 1 lbs per jar—keep jars light to avoid falls.
Make it Work: Adjust magnet strength for heavier ingredients, replace with labeled OXO containers for airtight storage, and ensure renters use non-permanent adhesive strips.
Pin now to reclaim your kitchen space! 🧲
6 Budget-Friendly DIY Drawer Dividers for Utensils
Messy drawers steal time and sanity in busy kitchens. Creating your own drawer dividers with affordable materials provides elegant compartmentalization for utensils and gadgets.
- Why it works: Prevents jumbling of utensils, optimizes drawer space, and quickens meal prep routines.
- Time: Prep 15 min | Assemble 45 min | Total 1 hour
- Cost: Under $30 | Skill: Easy
Materials: Lightweight wood or sturdy plastic trays from Rubbermaid or mDesign, fabric and glue for decorative touch, drawer organizers from Yamazaki Home for rental-friendly options.
Quick Steps: Measure drawer dimensions, cut trays or boxes accordingly, optionally wrap with fabric and glue for aesthetic appeal, then arrange inside drawers to create sections.
Make it Work: Tailor divider width to utensil size, consider rotational dividers for versatile organization, ideal for renters when using non-permanent modifications.
To read Christmas Wood Crafts: Rustic DIY Projects
Save this for streamlined kitchen drawers! 🍴
5 Simple DIY Pot and Cutting Board Hangers
Unused furniture sides are a hidden gem for storage. Adding wood trim to hang pots, pans, and cutting boards increases efficiency and refreshes your kitchen’s look.
- Why it works: Frees up cabinet interiors, takes advantage of vertical space, and adds decorative appeal.
- Time: Prep 10 min | Install 20 min | Total 30 min
- Cost: Under $15 | Skill: Beginner
Materials: Wood trim (matching cabinetry from Joseph Joseph or IKEA), nails, hammer, and hooks.
Quick Steps: Measure furniture side height, cut trim accordingly, nail trim securely, and hang pots and boards on sturdy hooks.
Make it Work: Customize hook placement according to pot sizes, consider magnetic strips from Simplehuman for metal tools, painting trim provides budget variation.
Pin to add handy storage in a snap! 🪵🔪
To read Christmas Wish List: Template and Organization Tips
Explore more DIY inspiration from trusted sources such as Sabrina’s Organizing and Yahoo Lifestyle to boost your kitchen’s functionality with quick, budget-friendly hacks applicable to any small kitchen. Don’t miss expert guides and free plans on Kreg Tool and Craftsy Hacks for step-by-step help. Catch video tutorials to visually guide your build and refinement. Your kitchen organization journey starts now!