Show index Hide index
- 1. Quick DIY Open Shelving That Brightens Small Kitchens
- 2. Budget-Friendly Pegboard Wall Organizer for Utensils
- 3. Easy Rolling Kitchen Cart for Flexible Storage & Prep
- 4. Clever Magnetic Knife Strip to Save Counter Space
- 5. Space-Saving Folding Breakfast Nook for Cozy Meals
- 6. Window Sill Herb Garden to Maximize Natural Light & Flavor
Struggling with a cramped kitchen that feels more chaotic than charming? You’re not alone! Many small kitchen owners face the daily battle of overflowing cabinets and cluttered countertops. Fortunately, transforming these tight spaces doesn’t require a costly overhaul. With six clever, budget-friendly kitchen storage projects, you can maximize every inch of your small kitchen, boosting functionality without busting your budget.
These smart, DIY-friendly solutions harness the power of vertical space, multipurpose furniture, and clever accessories from trusted brands like IKEA and Rubbermaid. Whether it’s creating stylish open shelving for instant accessibility or installing magnetic knife strips to free up counter real estate, each project promises quick setup, beginner-friendly steps, and costs under $50. Ideal for renters and small space dwellers alike, these ideas deliver practical storage solutions with a modern coastal flair—proving that even the tiniest kitchens can shine in 2025!
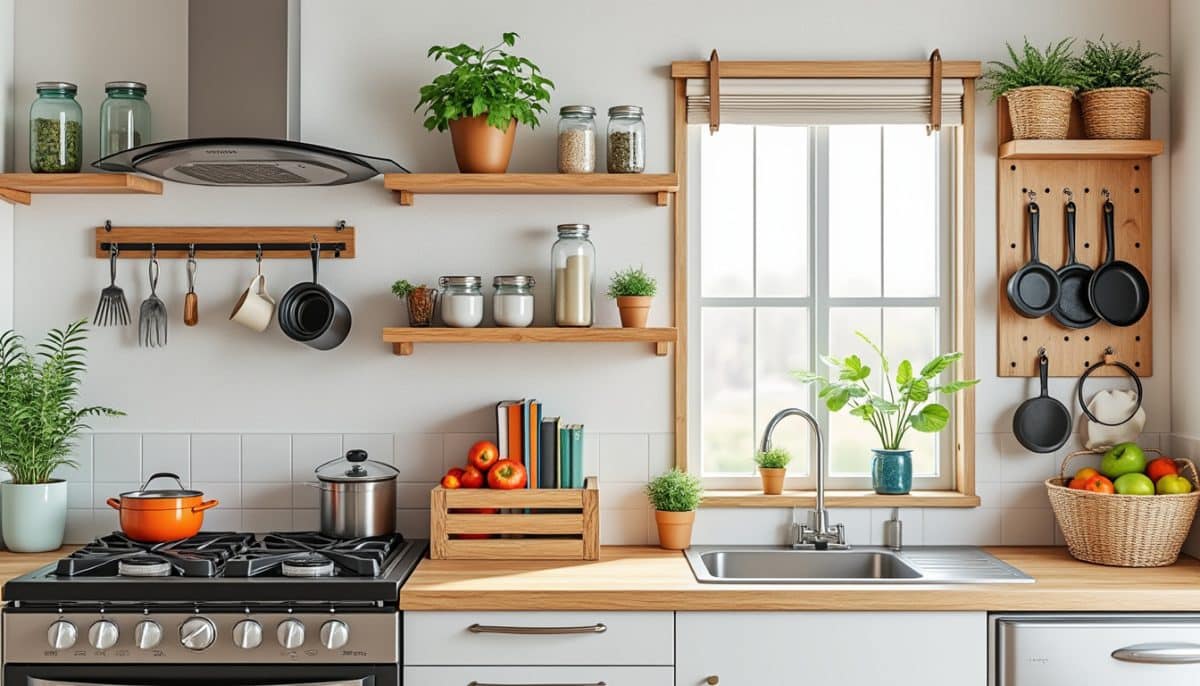
1. Quick DIY Open Shelving That Brightens Small Kitchens
Say goodbye to bulky cabinets and hello to open shelving! This budget-friendly project uses natural wood shelves paired with stylish drawer organizers and containers from The Container Store to create an airy vibe and easy access to daily essentials.
- Why it works: Utilizes vertical wall space and keeps dishes and spices visible and within reach.
- Time: Prep 15 min | Install 20 min | Total 35 min
- Cost: Under $40 | Skill: Beginner
- Materials: Wood shelves, shelf brackets, level, drill, wall anchors
Quick steps: 1) Measure your wall width to fit shelves. 2) Use a level to mark brackets for even placement. 3) Secure anchors and brackets, then mount shelves. 4) Arrange your mDesign and OXO containers for stylish storage. The shelves hold up to 30 lbs—perfect for plates and spice jars.
Make it work: Opt for lighter wood for rental flexibility or use command strips for a no-drill option. Swap shelf size per cabinet height for maximum fit.
2. Budget-Friendly Pegboard Wall Organizer for Utensils
Short on drawers? Transform an empty kitchen wall into a versatile storage hub using a pegboard fitted with hooks for utensils and pots. This affordable setup wipes out clutter efficiently and adds a modern coastal vibe.
To read Christmas Pattern: Seamless Designs for DIY Projects
- Why it works: Maximizes vertical space, making tools easily accessible.
- Time: Prep 10 min | Install 15 min | Total 25 min
- Cost: Under $35 | Skill: Easy
- Materials: Metal or wooden pegboard, pegs, hooks, drill, screws
Quick steps: 1) Measure wall area and select a pegboard size. 2) Mount pegboard securely using anchors. 3) Customize peg layout for hanging items using hooks and baskets. 4) Perfect for storing utensils, pans, and even small pots.
Make it work: Use removable hooks for renter-friendly setups or paint pegboard to match kitchen colors, adding a stylish contrast.
3. Easy Rolling Kitchen Cart for Flexible Storage & Prep
A wheeled cart is a small kitchen hero, creating extra counter space and storage where you need it—whether next to the stove or tucked in a corner. Combine baskets from Sterilite and organizer trays from SimpleHouseware for a practical, tidy solution.
- Why it works: Mobile, multifunctional, and adaptable to daily cooking needs.
- Time: Assembly 20 min | Setup 10 min | Total 30 min
- Cost: Under $50 | Skill: Beginner
- Materials: Rolling cart frame, baskets, storage trays, screwdriver
Quick steps: 1) Assemble cart frame per instructions. 2) Add stackable baskets or Sterling trays for categorizing spices, snacks, or utensils. 3) Position cart wherever extra prep or storage is needed. 4) Cart holds up to 50 lbs—heavy-duty for bulk storage.
Make it work: Choose a compact two-tier cart for very tight spaces or upgrade with a butcher block top for a DIY kitchen island. Easily moved for cleaning or entertaining.
4. Clever Magnetic Knife Strip to Save Counter Space
Say goodbye to bulky knife blocks by mounting a magnetic knife strip on a free wall or the side of your fridge. It clears precious counter space while adding sleek, modern charm. Pair with small glass jars from AmazonBasics for spices and herbs to elevate the look.
- Why it works: Frees up counter area and keeps knives within easy reach.
- Time: Prep 5 min | Install 10 min | Total 15 min
- Cost: Under $25 | Skill: Easy
- Materials: Magnetic strip, screws, screwdriver
Quick steps: 1) Choose optimal height and measure strip length. 2) Secure magnetic strip with screws. 3) Organize knives by size for balanced weight distribution. 4) Holds knives safely with a 10 lb capacity.
To read Christmas Crafts DIY: Handmade Projects Tutorial
Make it work: A renter-friendly option uses adhesive magnetic strips instead of screws. Choose color finishes to coordinate with kitchen hardware.
5. Space-Saving Folding Breakfast Nook for Cozy Meals
No room for a bulky dining table? A fold-down breakfast nook makes efficient use of wall space while offering a charming breakfast spot. Build from wood and simple hardware, then accessorize with compact stools from Joseph Joseph or mDesign.
- Why it works: Folds away to free space and adds functional seating.
- Time: Prep 25 min | Install 30 min | Total 55 min
- Cost: Under $50 | Skill: Easy to intermediate
- Materials: Folding table hinges, wooden board, screws, stools
Quick steps: 1) Measure wall length and desired table width. 2) Attach folding hinges and mount to wall securely. 3) Add stools that tuck under when folded. 4) Supports up to 75 lbs—ideal for meals or laptop work.
Make it work: DIY stain or paint to match coastal themes. Easily removable for renters. Versatile for small kitchens or compact dining spaces.
6. Window Sill Herb Garden to Maximize Natural Light & Flavor
Don’t miss out on your kitchen’s sunny window sill! Installing small containers for fresh herbs like basil and mint gives your space a cost-effective green boost and fresh ingredients just steps away.
- Why it works: Uses otherwise wasted window space, adds freshness and decor.
- Time: Setup 10 min
- Cost: Under $15 | Skill: Beginner
- Materials: Small containers, potting soil, herb seeds or starter plants
Quick steps: 1) Choose containers that fit your sill depth. 2) Fill with soil and plant herbs. 3) Rotate plants to ensure even light exposure. 4) Easy care allows kitchen gardening year-round.
Make it work: Repurpose glass jars or find budget containers via AmazonBasics. Perfect for busy families desiring fresh ingredients with minimal space and effort.
To read Christmas Wood Crafts: Rustic DIY Projects
These 6 kitchen storage projects under $50 offer quick, easy, and stylish solutions perfect for any small kitchen craving added space and calm amid daily chaos. Using quality organizing supplies from places like The Container Store and IKEA, paired with smart hacks, you can create an inspiring kitchen that works as hard as you do. Save these ideas for your next weekend project and watch your kitchen transform instantly!
Pin for your kitchen makeover! ✨
Save for weekend organizing! 🛠️
Effectiveness rating: ★★★★★