Show index Hide index
- 5 Simple Steps to Paint Foam Pumpkins Like a Pro with Dollar Store Supplies
- Mod Podge Magic: Create Stunning Decoupage Pumpkins with Dollar Store Finds
- 5 Genius Paint Techniques to Elevate Dollar Store Pumpkin Decor
- How to Craft Custom Pumpkin Stems with Dollar Store & Natural Elements
- 7 Creative Dollar Store Fall Decor Ideas Beyond Pumpkin Painting
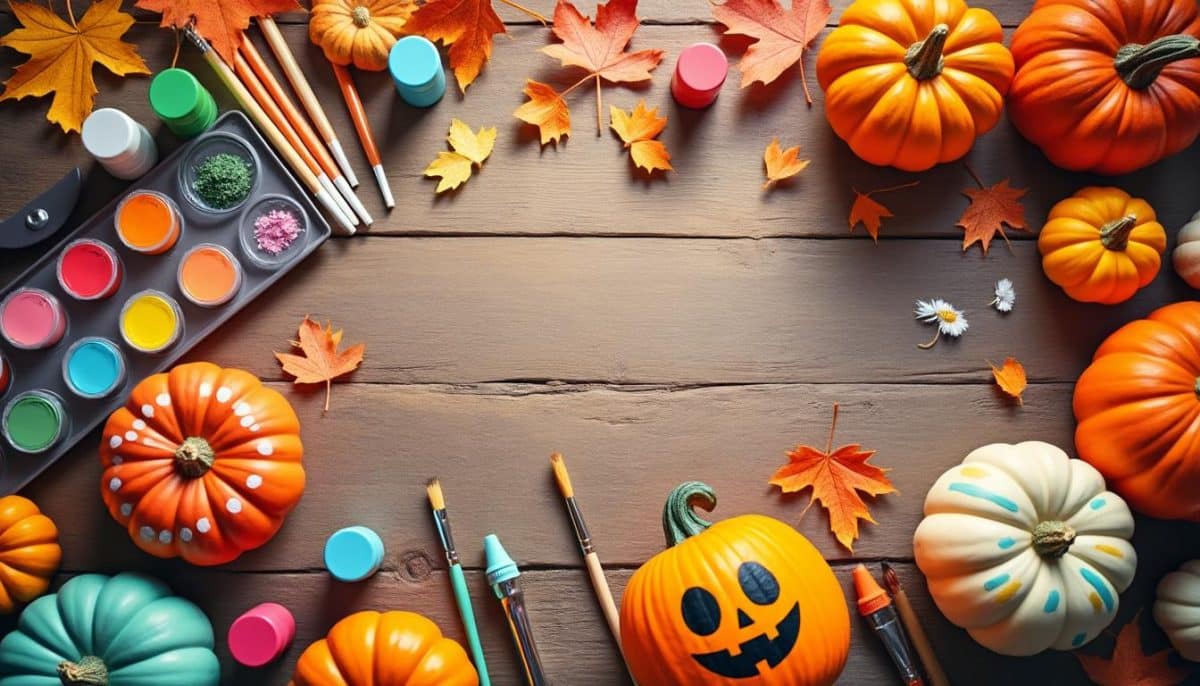
Fall decorating has never been more accessible and fun thanks to the growing trend of DIY pumpkin painting using affordable materials from stores like Dollar Tree. This season, creative crafters are embracing the charm of transforming plain foam and plastic pumpkins into gorgeous decor pieces that elevate any space with farmhouse flair or modern twist. What makes these projects even better? You only need a handful of supplies like acrylic paint sets, Mod Podge, and a few basic tools— all easy to snag on a budget. Imagine creating cozy fall vibes in your home without breaking the bank or spending hours on complicated crafts. Whether you’re aiming for rustic elegance, bold colors, or subtle texture, this guide dives into practical, quick, and tested ideas that anyone can do. Prepare to get inspired and find the perfect pumpkin makeover that suits your style with materials you already know and trust, such as FolkArt, Apple Barrel paints, or Crafter’s Square brushes. These projects bring a fresh, affordable revolution to seasonal decor, blending creativity with mindful living. Ready to discover how to transform your fall aesthetics? Let’s jump into simple steps, budget-friendly secrets, and must-try techniques using Dollar Tree supplies that guarantee a stunning result.
5 Simple Steps to Paint Foam Pumpkins Like a Pro with Dollar Store Supplies
Transforming basic foam pumpkins from Dollar Tree into eye-catching fall decor is easier than you think. The trick nobody knows is the power of priming and layering paint for that perfect finish. Here’s the secret recipe for success using common supplies like Apple Barrel acrylic paint and a few kitchen sponges from Dollar Tree.
- 🖌️ Step 1: Remove the original stems – Gently pull off the foam stems, which are usually secured by toothpicks, to prep for a clean paint job.
- 🎨 Step 2: Prime with a light base coat – Use chalk paint or a light color acrylic paint from the FolkArt range to cover the orange base and create a smooth canvas. Apply 1-2 coats and allow at least 1-2 hours to dry.
- 🌈 Step 3: Paint your pumpkins in the desired color – Pick from a palette such as rust orange, soft teal, or cream. Layer your favorite Crayola or Apple Barrel paint, waiting about two hours between coats for a flawless look.
- ✨ Step 4: Add depth with metallic accents – Using a kitchen sponge dabbed lightly in gold or bronze acrylic paint, apply subtle highlights for texture and dimension. This technique ensures your pumpkins have a professional vibe without extra cost.
- 🌿 Step 5: Prepare and attach natural or faux stems – Collect twigs from outdoors or buy faux stems available in craft stores like Crafter’s Square, then bake wooden stems at 200°F to prevent bugs and securely insert them into your pumpkins.
This process combines simplicity with an elegant result, using common materials found at Dollar Tree or any similar retailer. It’s a quick, budget-friendly way to craft impressive pumpkins that blend smoothly into any fall decor style.
Mod Podge Magic: Create Stunning Decoupage Pumpkins with Dollar Store Finds
Mod Podge is the DIY crafters’ secret weapon for pumpkin painting, especially when you want to add intricate designs without freehand drawing. This technique breathes fresh life into those plain orange pumpkins using decorative napkins, scrapbook paper, or fabric, all sourced cheaply at Dollar Tree or similar stores. Below is a step-by-step method to instantly upgrade your fall centerpiece.
- 🖌️ Prepare the pumpkin surface – Paint a base coat of white or cream acrylic paint to ensure your napkin or paper patterns pop.
- ✂️ Cut and separate your napkins – Dollar Tree napkins are usually two-ply; separate layers for easier application.
- 🌟 Apply a thin layer of Mod Podge – Use a paintbrush to coat a section of the pumpkin lightly and press the napkin or paper gently.
- 💧 Smooth and seal – Remove bubbles or wrinkles by smoothing the napkin and top with another Mod Podge layer to seal.
- 🎀 Accessorize – Tie a decorative ribbon from Scotch brand or Elmer’s glue embellishments around the stem for an extra touch of charm.
This craft is perfect for budget-conscious decorators who want something vibrant and unique without complex skill. Plus, the use of Elmer’s glue and Mod Podge ensures durability and longevity. For visual inspiration and detailed guidance, check out elegant DIY decoupage pumpkin tutorials on First Day of Home and Pickled Barrel.
5 Genius Paint Techniques to Elevate Dollar Store Pumpkin Decor
Painting pumpkins from Dollar Tree doesn’t have to be ordinary. Elevate your craft with advanced tricks using affordable products like FolkArt and Apple Barrel acrylic paint sets, kitchen sponges, and simple household tools. These methods introduce texture, shading, and personalization that transform basic orange foam into striking art pieces. Here are five techniques to try today:
To read Christmas Window Painting: DIY Tutorial and Ideas
- 🎨 Layered Color Blending – Mix rust, teal, and cream shades for a velvet pumpkin effect. Use light layering and blending with a damp sponge for gradual transitions.
- 🖌️ Dry Brushing – With a nearly dry brush dipped lightly in metallic gold or bronze paint, swipe across the pumpkin to highlight ridges and bring out natural contours.
- 🌾 Speckling – Flick a toothbrush loaded with paint to create rustic specks resembling real pumpkin texture.
- 🧽 Sponging with Contrast – Dab dark-colored paint sparingly to add depth. This trick is particularly effective when layering on top of a primed white base.
- 🔄 Matte to Gloss Contrast – Seal your painted pumpkin with a matte varnish and add selective gloss accents on highlights or the stem for a luxe finish.
These techniques can be mixed and matched for an individual look. Detailed tutorials covering these styles and other creative inspiration are available on sites like Lost and Found Decor and Hardworking Mom. Experimenting with painting styles turns pumpkin projects into artistic adventures that brighten homes instantly.
How to Craft Custom Pumpkin Stems with Dollar Store & Natural Elements
What truly sets your DIY pumpkin apart is the stem. Creating or sourcing realistic, unique stems can redefine your decor game. Natural twigs from local parks or store-bought faux stems from the Dollar Tree can be turned into charming, rustic features with minimal effort.
- 🌿 Collect natural twigs – Look for sturdy, length-appropriate twigs cushioned by dry bark for authentic farmhouse appeal.
- 🔥 Dry and sanitize – Bake wooden stems or twigs at 200°F (93°C) to ward off insects and ensure durability.
- 🔧 Insert securely – Use small holes pre-made with a skewer or craft knife to gently insert stems into the foam pumpkins without splitting.
- 🎀 Optional decoration – Add decorative elements like mini wooden fall leaves or tied-on Crafter’s Square ribbons with Scotch double-sided tape for an elegant finishing touch.
- 🍂 Reuse real pumpkin stems – Clean, dry, and store stems from real pumpkins to reuse season after season as a sustainable decor hack.
These natural-inspired stems provide texture contrast and elevate even the simplest painted pumpkin into a sophisticated artisan piece. For more insight and stem sourcing tips, visit DIY With My Guy and Intelligent Domestications.
7 Creative Dollar Store Fall Decor Ideas Beyond Pumpkin Painting
While pumpkin painting steals the spotlight, Dollar Tree offers endless ideas to create entire fall displays on a budget. Use your painted pumpkins as centerpiece starters and build around them with complementary crafts that blend color, texture, and cozy vibes.
- 🍁 Mod Podge pumpkins – As detailed earlier, this technique adds visual interest and personalization to your entire fall decor collection.
- 🌻 Floral centerpieces – Utilize Dollar Tree vases, floral foam, and faux fall flowers to make versatile seasonal arrangements perfect for tables or counters.
- 🪵 Painted wood blocks – Turn Jenga-like blocks into warm words like “COZY” or “FALL” using apple barrel paints and embellish with hot glue florals.
- 🎃 Wine glass pumpkin holders – Flip painted wine glasses upside down, decorate bases with moss or leaves, and top with mini pumpkins to create elegant luminaries.
- 💡 DIY lanterns – Construct lanterns from Dollar Tree picture frames and add a flameless candle inside for rustic ambience perfect for porches or mantles.
Ready to expand your DIY fall vibe? Check out detailed tutorials and countless ideas on websites like The Crazy Craft Lady and Crafty Life Mom. Combining these ideas with your painted pumpkins brings a cohesive, warm, and stylish seasonal atmosphere to any room.