Show index Hide index
- 5 Quick DIY Kitchen Storage Ideas Under $50 for Small Spaces
- 1. Install Adjustable Shelves to Maximize Vertical Storage
- 2. Upgrade Utensil Organization with YouCopia Drawer Dividers
- 3. Use Tiered Spice Racks for Visible and Accessible Flavor
- 4. Store Pots and Pans Vertically Using Pull-Out Racks
- 5. Optimize Under-Sink Space with Stackable, Pull-Out Bins
- Small Kitchen Organization Tips That Bring Instant Results
- 6. Create a “Mug Wall” to Free Up Cabinet Shelves
- 7. Label Pantry Jars for Quick Identification Using Utopia Kitchen Labels
- 8. Incorporate Simplehuman Magnetic Knife Strips for Counterfree Prep Space
- 9. Utilize mDesign Shelf Risers to Double Cabinet Storage Height
Is your kitchen a battleground of cluttered cabinets, overflowing drawers, and countertop chaos? You’re not alone. Many homeowners struggle to find order in their cooking spaces, especially those with limited room or busy schedules. Luckily, transforming your kitchen into a functional, inspiring haven doesn’t require a costly remodel or full-day overhaul. By tapping into clever, budget-friendly solutions that harness every inch of space—from underused cabinet doors to vertical shelves—you can create a kitchen that sparks creativity and efficiency. Whether it’s mastering the art of drawer dividers from YouCopia or installing Simplehuman pull-out racks for pots and pans, these smart kitchen organization ideas blend form and function seamlessly. Tailored for small kitchens, renters, and busy families, these practical methods promise swift, under-$50 upgrades that make meal prep smoother and storage smarter. Ready to turn your kitchen chaos into calm? Let’s dive into these game-changing hacks that truly work and bring instant joy to cooking and organizing.
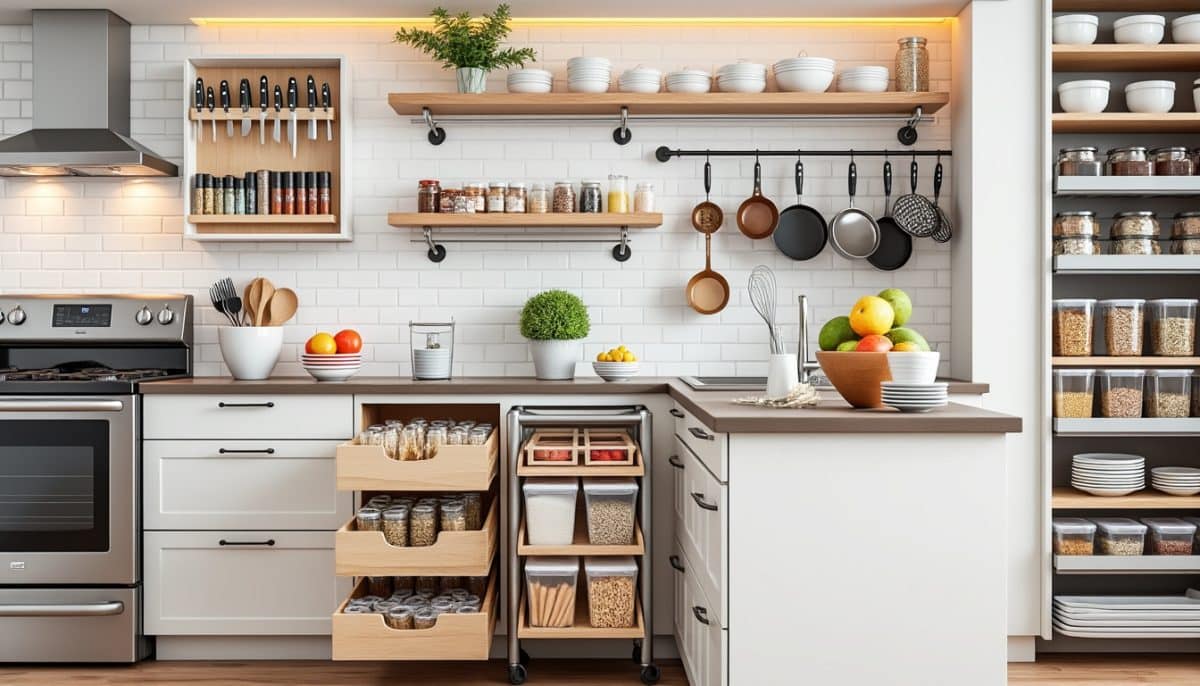
5 Quick DIY Kitchen Storage Ideas Under $50 for Small Spaces
Struggling with tight spaces? These projects instantly improve storage without major renovations. They use supplies like OXO drawer organizers, mDesign clear containers, and rubbermaid shelf risers to keep essentials neat and accessible for busy schedules.
1. Install Adjustable Shelves to Maximize Vertical Storage
Why it works: Adjustable shelves help tailor cabinet space for tall bottles and stacked bowls, doubling usable space where fixed shelves fall short.
Time: Prep 10 min | Install 20 min | Total 30 min
Cost: Under $40 | Skill: Easy
- Materials: Joseph Joseph adjustable shelf inserts
- Tools: Screwdriver, measuring tape
Quick Steps:
- Measure cabinet height and space between shelves.
- Choose shelf inserts fitting your cabinet’s dimensions.
- Install by securing with provided hardware.
- Arrange items by height for easy access and maximum storage.
Make It Work: Renters can use tension-mounted shelves to avoid holes. Swap wood for plastic inserts to fit budget.
To read Christmas Door: Entry Makeover Ideas for Maximum Impact
Explore more adjustable shelf hacks here
2. Upgrade Utensil Organization with YouCopia Drawer Dividers
Why it works: Separating utensils by task speeds up meal prep and reduces frustration from tangled kitchen tools.
Time: Prep 5 min | Install 5 min | Total 10 min
Cost: Under $30 | Skill: Beginner
- Materials: YouCopia adjustable bamboo drawer dividers
- Tools: None required
Quick Steps:
- Clear out and clean the utensil drawer.
- Measure drawer width and length to allocate sections.
- Place dividers accordingly, grouping by frequency of use.
- Regularly reassess and shift dividers as cooking habits evolve.
Make It Work: For rental kitchens, choose removable dividers; DIY with oak sticks if budget is tight.
See simple utensil organizing tips
3. Use Tiered Spice Racks for Visible and Accessible Flavor
Why it works: Tiered racks put spices front and center, inspiring creativity and preventing duplicates.
To read Dehumidifiers Halloween Decoration Preservation
Time: Prep 5 min | Install 10 min | Total 15 min
Cost: Under $25 | Skill: Easy
- Materials: mDesign or Prepworks tiered spice organizer
- Tools: None
Quick Steps:
- Empty existing spice cabinet section.
- Group spices by flavor profile to mimic an artist’s palette.
- Place rack in an accessible spot near the stove.
- Refill small glass jars labeled with contents and dates for uniformity.
Make It Work: Use magnetic spice containers on a Simplehuman magnetic strip to save more space.
Get inspired with creative spice storage
4. Store Pots and Pans Vertically Using Pull-Out Racks
Why it works: Vertical storage prevents scratching and pan avalanche, making cookware easy to grab.
Time: Prep 10 min | Install 20 min | Total 30 min
Cost: Under $50 | Skill: Easy
- Materials: Rubbermaid or Simplehuman pull-out pan racks
- Tools: Drill, screwdriver
Quick Steps:
To read 8 Easy Garage Projects That Add Serious Storage
- Clear out cabinet and measure width and height.
- Install racks vertically along cabinet walls.
- Place pans and lids separately; store lids upright in slim bins.
- Test for smooth gliding and adjust as needed.
Make It Work: Renters can opt for freestanding vertical racks on cabinet shelves instead of drilling.
Find vertical pan organizer ideas here
5. Optimize Under-Sink Space with Stackable, Pull-Out Bins
Why it works: Stackable bins counter under-sink pipes and dark corners by categorizing cleaning supplies and freeing front space.
Time: Prep 5 min | Setup 15 min | Total 20 min
Cost: Under $40 | Skill: Beginner
- Materials: Honey-Can-Do or iDesign stackable bins, tension rod
- Tools: Measuring tape, optional drill
Quick Steps:
- Measure under-sink dimensions including pipe height.
- Place stackable bins with daily essentials in front.
- Install tension rod above to hang spray bottles.
- Keep less-used items in deeper bins at the back.
Make It Work: Use clear bins to see contents; perfect for renters as no permanent modifications needed.
Try more under-sink organization ideas
To read 9 Garage Organization That Handles Everything
Small Kitchen Organization Tips That Bring Instant Results
Discover ingenious ways to convert every nook into useful storage. From OXO drawer systems to mDesign clear containers and Rubbermaid shelf risers, these hacks make small kitchens feel spacious and efficient.
6. Create a “Mug Wall” to Free Up Cabinet Shelves
Why it works: Hanging mugs on wall hooks turns your favorite cups into decor while freeing valuable shelf space.
Time: Prep 5 min | Install 10 min | Total 15 min
Cost: Under $20 | Skill: Easy
- Materials: Simplehuman wall hooks or adhesive mug racks
- Tools: Drill or adhesive options for renters
Quick Steps:
- Choose wall space near coffee station or sink.
- Install hooks evenly spaced to hold mugs safely.
- Arrange mugs by size or theme for visual appeal.
- Mix functional storage with decorative display.
Make It Work: For renters, use strong adhesive hooks; change design seasonally for a fresh look.
See creative mug wall inspirations
7. Label Pantry Jars for Quick Identification Using Utopia Kitchen Labels
Why it works: Clear labels eliminate guesswork, help track freshness, and prevent buying duplicates.
To read 6 Smart Garage Storage for Small Budgets
Time: Prep 10 min | Total 10 min
Cost: Under $15 | Skill: Beginner
- Materials: Utopia Kitchen label set, mDesign clear storage jars
- Tools: None
Quick Steps:
- Transfer dry goods into uniform glass or acrylic containers.
- Write content and expiration date on labels.
- Stick labels on the jars’ fronts for instant visibility.
- Update labels when refilling.
Make It Work: Use chalkboard labels for a reusable option or digital printing for a modern kitchen look.
Explore pantry labeling ideas here
8. Incorporate Simplehuman Magnetic Knife Strips for Counterfree Prep Space
Why it works: Magnetic strips keep knives visible and accessible while leaving counters uncluttered and hygiene high.
Time: Prep 5 min | Install 15 min | Total 20 min
Cost: Under $50 | Skill: Easy
- Materials: Simplehuman magnetic knife strip
- Tools: Drill, level
Quick Steps:
- Pick a backsplash spot within easy reach.
- Mount magnetic strip steadily using screws.
- Arrange knives by size or usage frequency.
- Use for metal utensils like scissors or shears too.
Make It Work: Use removable strips or adhesive versions for renters; supplement with magnetic knife block for travel safety.
9. Utilize mDesign Shelf Risers to Double Cabinet Storage Height
Why it works: Shelf risers create an additional layer, ideal for stacking plates or storing smaller items without crushing them.
Time: Prep 5 min | Setup 5 min | Total 10 min
Cost: Under $30 | Skill: Beginner
- Materials: mDesign metal or plastic shelf risers
- Tools: None needed
Quick Steps:
- Clear cabinet shelf where risers will go.
- Place risers according to shelf dimensions.
- Store everyday dishes or cups on top, extra items below.
- Keep fragile items spaced to avoid damage.
Make It Work: For adjustable cabinets, combine risers with adjustable shelves for layered storage perfection.
Discover more shelf riser uses