Show index Hide index
- 5 Quick Wreaths & Garland Projects for Budget-Friendly Christmas Decorations
- 4 Genius Centerpiece & Table Decor DIY Christmas Ideas Under $20
- 6 Simple Handmade Ornaments and Tree Decor to Elevate Festive Home Decor
- 3 Clever Gift Wrap & Stocking Alternatives for Budget DIY Holiday Decorations
- 5 Storage, Prep, and One-Weekend Crafts to Finish Holiday Decorations Fast


5 Quick Wreaths & Garland Projects for Budget-Friendly Christmas Decorations
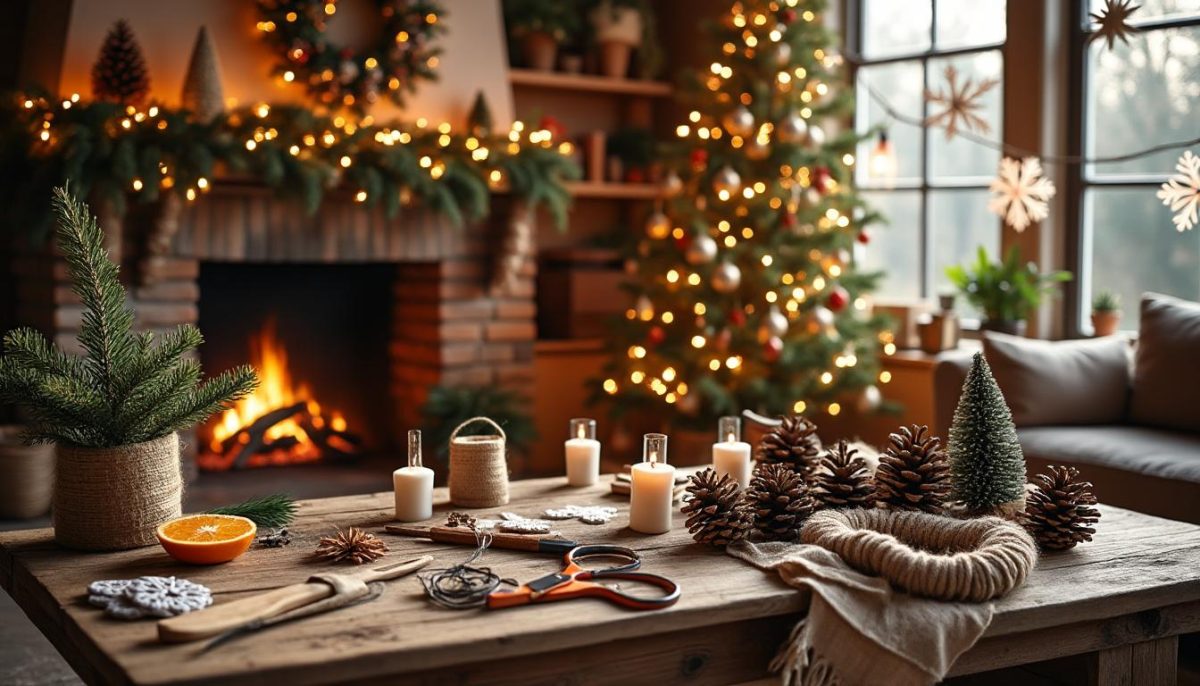
Start with a simple base and add texture for instant impact. Use a metal ring, willow rattan, or a roll of chicken wire as the foundation to keep costs low and results professional. For a natural feel, clip evergreens into 8–10 inch bundles and secure them with jute twine; larger bundles create a fuller wreath while smaller bundles finish inner and outer edges for a polished look.
Choose one focal technique: moss layering, burlap loops, star anise or clipped foliage. Moss and jute create an earthy, compostable wreath; burlap folded into loops gives rustic volume; star anise glued individually produces a scented, woodland accent. Each approach uses inexpensive supplies and yields a different aesthetic—select the method that matches the room or porch you’re decorating. 🎄
Follow a timed plan: 20 minutes prep, 30–45 minutes assembly. Gather materials the day before: a wreath base, scissors, floristry wire, ribbon, and decorative touches like pinecones, dried citrus, or small ornaments. Lay out components in color groups to speed assembly and maintain cohesion. This time-boxed method prevents crafting fatigue and produces consistent results across multiple wreaths.
Use chicken wire for large installations like arches and oversized garlands. Cut and shape the wire into a cylinder, secure ends by twisting, and anchor to existing door frames or hooks with heavy-duty zip ties. Thread in foraged branches and faux stems for longevity; the wire frame gives dramatic volume while keeping costs under $25 in most cases. 🌿
Try the faux-garland hack: upgrade one basic garland in 30 minutes. Purchase an affordable faux pine garland and personalize by wiring in cinnamon sticks, pinecones, ribbons, or battery-powered fairy lights. This keeps the initial investment low but yields a high-style result that stores and reuses year after year. For inspiration on budget tactics and creative accents, explore practical tips at ways to stretch your holiday decorating budget.
Incorporate scent as décor: dried orange slices, star anise, and cinnamon. Dry citrus rounds thinly sliced at ½ inch in an air fryer or oven for 30–60 minutes at low temperature, then thread with twine. These make both garlands and wreath accents that smell delightful and cost pennies per item. A scented wreath elevates entryways and creates a welcoming atmosphere at minimal expense.
To read Christmas Ornament Crafts: DIY Projects for All Ages
Finish like a pro: add a velvet ribbon and hide stems carefully. Twist floristry wire into 6-inch stems for each decorative piece, tuck them into the moss or burlap, and fold excess wire inward to avoid door scratches. A wide velvet ribbon creates a nostalgic, upscale finish even on budget materials. For additional rustic wreath designs and detailed instructions, see the creative ideas at Homes & Gardens DIY Christmas craft ideas.
Key takeaway: Choose one assembly technique, timebox the work, and finish with a ribbon and hidden wire for a low-cost, high-style wreath. ✨
4 Genius Centerpiece & Table Decor DIY Christmas Ideas Under $20
Centerpieces should be liftable, layered, and reusable. Arrange candles, pinecones, and sprigs on a tray or low basket so the display can be cleared quickly for serving. Mixing heights with pillar candles and tea lights keeps sightlines friendly for conversation while maintaining the festive mood.
Make beeswax candles in 10–20 minutes each with simple materials. Cut beeswax sheets to match wick length, roll tightly around the wick, and press edges to seal. Decorate with sprigs of rosemary or dried orange slices for a fragrant, seasonal touch. Store in a cool place before use to extend burn life. 🕯️
Create pomander displays using oranges and whole cloves for color and aroma. Push cloves into oranges in decorative patterns; mount each orange on a skewer and set into foam or a wire grid inside a wooden crate or serving bowl. Add fir sprigs and berries for texture. This look is showy, inexpensive, and lasts for weeks on a dining table with occasional misting.
Use potted branches and hanging glass ornaments for minimalist Scandi charm. Place a simple branch centerpiece in a pitcher and hang small glass baubles and fairy lights from its twigs; the effect is dramatic but uses very few materials. Arrange the branch on a runner or scarf to add color without buying a runner. For folding napkin tree techniques and contemporary table styling, see practical folding steps at budget decorating tips.
Make mulled-spice jars as decor and gifts for the table. Dry citrus rinds and combine with cinnamon, star anise, cloves, and cardamom in mason jars. Label with cooking instructions and place a jar at each setting as both a gift and a festive aroma source. This doubles as decor and a warming party activity: add wine and simmer when guests arrive.
To read Disney Christmas: Magical Decoration and Party Ideas
Plan supplies and costs: set a $20 cap per centerpiece with a quick checklist. Example budget: tray $5 (thrift), candles $6, sprigs/pinecones $3 (foraged), ribbon $2, dried citrus $4 — total under $20. This practical budget breakdown keeps decor affordable and repeatable across multiple tables. For more rustic centerpiece ideas and step-by-step inspiration, consult curated ideas at budget stretching tips.
Key takeaway: Focus on liftable bases, scent, and layered heights to create memorable tablescapes under $20. 🍊
6 Simple Handmade Ornaments and Tree Decor to Elevate Festive Home Decor
Handmade ornaments personalize the tree and become keepsakes. Use fillable glass baubles to add small photos, ticket stubs, or pressed petals for instant nostalgia. Sealable baubles and decoupage techniques keep costs low while producing long-lasting memories.
Create strawflower or dried-flower baubles with hot glue and color planning. Select three to five coordinating hues per ornament and glue flower heads in rings from top to bottom. Position larger heads next to smaller buds to vary texture and visual weight. Hang finished baubles with ribbon and store in tissue for reuse each year. 🌸
Cut paper snowflakes for a charming, low-cost tree accent or garland. Fold squares into triangles and trim shapes to form intricate patterns; use old music sheets or kraft paper for visual interest. Display individual snowflakes in the tree, hang a snowflake mobile from the ceiling, or create a string of snowflakes for a window display. For tutorials on snowflake folding and printable patterns, explore approachable projects at Crafty Daily DIY Christmas decor.
Upcycle fabric scraps into cozy ornament covers. Wrap older baubles with plaid or sweater fabric and secure with hot glue for a cottage-core look. This method hides imperfections and refreshes sentimental ornaments without buying new sets.
Transform book pages into tabletop trees and vintage ornaments. Fold book pages into cones and stack to make mini trees for mantels or group them as a centerpiece. The paper-tree technique is an inexpensive alternative to small tabletop trees and creates an instant literary aesthetic. For more creative ornament concepts and nostalgic designs, review ideas at Country Living craft ideas.
To read Handmade Christmas Gifts: Personal Presents They’ll Cherish
Add a chalk window display behind the tree for a layered, festive backdrop. Use liquid chalk markers to draw snowflakes, baubles, and festive messages on the window facing passersby. Start with white for structure, then add red and green accents. If a mistake happens, wipe and retry—this medium is forgiving and playful.
Key takeaway: Combine one sentimental technique with one low-cost material to create ornaments that feel store-bought and handmade at once. 🎁
3 Clever Gift Wrap & Stocking Alternatives for Budget DIY Holiday Decorations
Replace expensive wrapping paper with reusable fabric using the furoshiki method. Place a gift on a square cloth, fold corners to the center, and tie—no tape required. Use scarves, tea towels, or thrifted fabric for a luxe, sustainable presentation that becomes part of the gift.
Customize kraft paper with stamps, leaf printing, or potato block prints for a personal finish. Use a date stamp or hand-carved potato stamp to repeat a motif quickly. Add a sprig of greenery and jute for a natural accent. Hand-printed wraps look intentional and cost far less than boutique paper options. For techniques and inspiration on block printing and fabric stenciling, reference practical guides at DIY Christmas decorations easy.
Make reusable fabric gift bags and stencil them for a polished look. Insert cardboard inside the bag while stenciling to prevent bleed-through, use dabbing motions with a stippling brush, and finish with glitter or ribbon once dry. These bags are part of the gift and cut down on single-use waste over time.
Decorate with pom poms and cookie-cutter garlands for playful accents. Glue mini pom poms to simple wrapped boxes to create characters like Rudolph, or string cookie cutters with ribbon for a kitchen-to-decor crossover. These simple touches are quick to assemble and delight children and adults alike. For creative wrapping stretches and seasonal DIY alternatives, see ideas at Martha Stewart’s DIY Christmas decorations.
Key takeaway: Use fabric, stamps, and reusable bags to reduce cost and increase charm in holiday wrapping. 🎀
To read Christmas Crafts DIY: Handmade Projects Tutorial
5 Storage, Prep, and One-Weekend Crafts to Finish Holiday Decorations Fast
Inventory and plan 45–60 days ahead to reduce last-minute spending and stress. Create a catalog of existing ornaments, lights, and ribbon; decide which DIY projects will complement what’s already owned. This planning window allows for sales shopping and foraging for natural accents like pinecones or evergreen clippings.
Use clear bins, labeled dividers, and a master list to keep decor organized year-to-year. Wrap fragile ornaments in tissue and store by theme, color, or room to speed seasonal setup. Apply this same system to ribbons, garlands, and craft supplies so weekend assembly becomes a streamlined production, not a scavenger hunt.
Choose three one-weekend projects to complete quickly: dried orange garland, pomander balls, and cinnamon candle holders. Dry citrus in the oven or air fryer at low heat for several hours, then thread onto twine. Create pomanders by pressing cloves into oranges and arranging on skewers; place in decorative bowls for an aromatic centerpiece. Tie cinnamon sticks around jars or candles with jute for rustic holders. These projects are budget-friendly and stackable for quick visual impact. 🔧
Set realistic supply lists and cost caps for each project to keep budgets intact. Example: dried orange garland – oranges $6, twine $2, ribbon $2; beeswax candle set – beeswax $10, wicks $3; total ensures spending remains predictable. For additional budget-savvy collections and seasonal checklists, consult curated pages like budget-friendly Christmas decorations and practical storage tips at Prudent Penny Pincher.
Keep a weekend timeline: Friday prep, Saturday assembly, Sunday touch-ups. Prep advance by collecting tools and materials Friday evening; assemble key pieces Saturday with music and hot drinks; finalize ribbon placement and lighting Sunday. This timeline reduces fatigue and produces consistent, repeatable results that feel celebratory rather than chaotic.
Key takeaway: A short planning window, clear storage, and three one-weekend projects will transform the home affordably and efficiently—now go pin, prep, and create! 📌 Save for reference!