Show index Hide index
- 5 Easy Crochet Christmas Ornaments: Free Pattern Collection for Instant Holiday Decor
- How to launch quickly
- Materials & Tools for Crochet Christmas Ornaments: Budget, Time, and Supply Checklist
- Budget breakdown and time estimates
- Step-by-Step: Gingerbread Man and Star Ornament Free Patterns with Visual Tips
- Gingerbread man: execute in practical steps
- Star ornament: crisp points and finishing tips
- Advanced Amigurumi Ornaments: Gnome, Penguin, and Snow Globe Free Patterns for Intermediate Crafters
- Gnome ornament workflow
- Penguin and snow globe techniques
- Styling, Gifting, and Selling Crochet Christmas Ornaments: Display Ideas and Seasonal Planning
- Gift ideas and personalization
- Selling and market-ready presentation


5 Easy Crochet Christmas Ornaments: Free Pattern Collection for Instant Holiday Decor
Answer first: Pick any three quick patterns—simple star, ball bauble, and snowflake—to finish in under 30 minutes each and instantly add festive charm to a tree. 🎄
Start with those three because they work with worsted weight yarn, a common hook (4.0–5.5 mm), and minimal notions like a yarn needle and scissors. These projects are ideal for using leftover yarn and making batch gifts. ✨
Why choose quick ornaments? They solve holiday time pressure and create cohesive sets for gifting, decorating, or selling at a craft fair. Focus on patterns that clearly list hook sizes and yarn weights so prep time is predictable.
How to launch quickly
Conclusion first: assemble one small kit with a hook, three yarn scraps, and a couple of stitch markers; that kit yields multiple ornaments fast. This reduces decision fatigue and speeds production.
Actionable steps: gather a 4.0 mm hook, three colors of worsted yarn (20–30 yards each), a tapestry needle, and a 10–15 minute reference pattern. Use pattern sources like 25 free crochet patterns and Handy Little Me’s ornament roundup to pick tested, photographed tutorials.
Example: the simple star pattern finishes in three rounds; the snowflake uses six to eight rounds but blocks flat for a crisp look. A single ball bauble can be crocheted in the round and stuffed lightly for a plush ornament.
To read Christmas Table Decor: Create a Stunning Holiday Setting
Pro tip: work one ornament at a time in an assembly-line: make five stars, then five balls, then five snowflakes. This method keeps momentum and produces matching sets for gift ideas. 🎁
Maya, the fictional maker in this guide, sets a 90-minute evening goal: three stars and a ball. That target is realistic and motivating during busy holidays. This approach shows how structured goals turn creative energy into finished ornaments.
Before moving on: pin this page for reference and clip two patterns to the craft queue. Save for reference! 🔖
Materials & Tools for Crochet Christmas Ornaments: Budget, Time, and Supply Checklist
Conclusion first: a small, focused supply list keeps projects quick and costs low—most ornaments require under $15 in materials when using standard supplies. 💸
List the essentials: a set of crochet hooks (2.5–5.5 mm preferred), worsted weight yarn in core colors, tapestry needles, stitch markers, a bit of stuffing, and optional safety eyes for amigurumi. This minimal kit covers both flat and 3D ornaments.
Budget breakdown and time estimates
Short answer: expect to spend $2–$10 per dozen ornaments on yarn when using scraps or economy skeins. Bulk worsted yarn can be $6–$12 per skein; each small ornament uses 10–40 yards. That makes batch crafting economical for holiday gifts or markets.
Time per item: simple stars and snowflakes = 10–25 minutes; small amigurumi like mice or penguins = 45–90 minutes each. Use a timer to track pace and set realistic production goals for holiday markets or handmade gift lists.
To read Christmas Prints: Downloadable Art for Your Home
Example supplies set: one 200-yard worsted skein (main color), two 50-yard scraps (accents), a 4.0 mm hook, tapestry needle, stuffing, and 12″ of ribbon for hanging. Most patterns, such as those curated at Yarns and Crafts and Easy Crochet, will show exact yardage and hook size.
Practical tip: label small zip bags with the pattern name, required hook, and yardage. That step saves time later and keeps kits portable for stitch meetups or commute crafting. 🧶
Maya’s workshop organizes supplies by color and project. The result: a clockwork cadence during holiday evenings where ornaments move from hook to finishing in steady batches. This fictional workflow demonstrates how organization directly reduces time-to-finish.
Common mistakes to avoid: starting a complex amigurumi without checking eye safety rules, or using a yarn weight mismatch that changes finished size. Always read the pattern’s materials list before beginning.
Key insight: a small investment in a good hook set and a consistent yarn weight pays off in uniform ornaments and faster stitching. Transition next to hands-on pattern walkthroughs where those supplies get used. 🎬
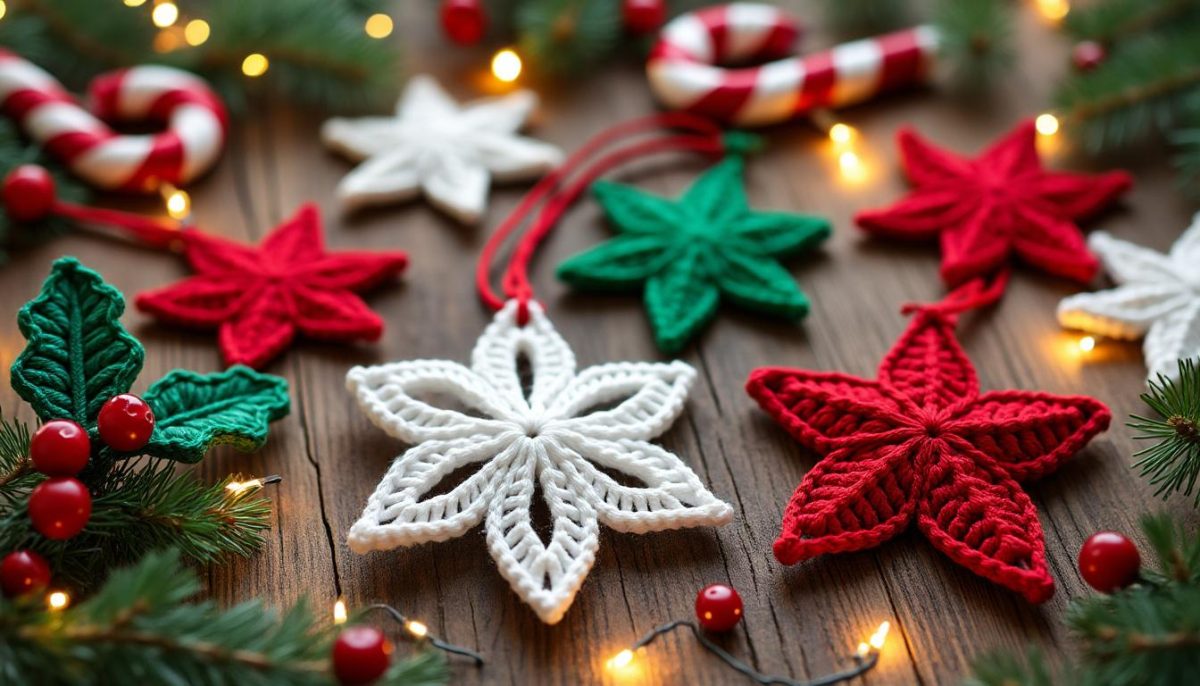
Step-by-Step: Gingerbread Man and Star Ornament Free Patterns with Visual Tips
Answer first: follow a clear two-part workflow—(1) base shapes then (2) details—to finish a gingerbread man and star ornament efficiently. 🍪⭐
Start with the base: crochet flat or in the round according to the free pattern. For a gingerbread man, work two identical flat pieces and sew them together, leaving a small gap for stuffing. For a star, complete one piece and block it for crisp points.
To read Handmade Christmas Gifts: Personal Presents They’ll Cherish
Gingerbread man: execute in practical steps
Conclusion first: make the body, stuff lightly, then add icing details last. This order prevents distortion of the shape during finishing.
Detailed steps: use a 3.5–4.0 mm hook with worsted weight yarn in light brown (approx. 30–40 yards). Crochet two silhouettes following a free pattern source like the cookie-style ornaments featured at Make and Do Crew. Place pieces together, whipstitch edges with a tapestry needle, stuff evenly with polyester fill, then close.
Decoration: use contrasting yarn and a smaller hook or duplicate stitch to add “icing” lines and small buttons. Safety eyes are optional—embroidery often gives a more handcrafted look and is safer for gifts to young children.
Star ornament: crisp points and finishing tips
Conclusion first: blocking the star after finishing is the secret to professional-looking points. Blocking sets the stitches and stabilizes the shape.
Practical method: crochet the star using a pattern similar to those in curated collections like Keepsakes Collection. Use a 3.5–4.0 mm hook and one skein of worsted yarn. After completing the rounds, wet-block the star on a flat surface, pin points into shape, and let dry. Add a leather or ribbon loop for hanging.
Example: a multi-colored star uses five small color changes; plan color transitions and weave in ends neatly on the inside to avoid bulk at the hanging loop. Pin the finished star to a tree sample to check balance—if it tilts, add a tiny counterweight inside the upper tip before sealing.
Finishing touch: thread metallic embroidery floss through the hanging loop for a subtle sparkle. This elevates a simple yarn star into a modern, handmade ornament perfect for contemporary holiday decor. ✨
To read Christmas Living Room: Transform Your Space for the Holidays
Maya’s finishing ritual: a quick steam-block and a ribbon tie transforms a pile of motifs into a cohesive set ready for gifting. That small extra step creates ornaments that look boutique-ready.
Insight: follow the two-phase workflow—shape first, detail second—to produce consistent, gift-quality ornaments and move confidently to more advanced amigurumi projects next. 🎁
Advanced Amigurumi Ornaments: Gnome, Penguin, and Snow Globe Free Patterns for Intermediate Crafters
Answer first: tackle one amigurumi ornament at a time and practice tension control—consistent tension ensures parts fit together cleanly and ornaments hang straight. 🧸
Start with gnomes and penguins because they use compact shapes and minimal color changes. Choose patterns with photo tutorials like the gnome at Once Upon a Cheerio and penguin guides at The Nomad Knot.
Gnome ornament workflow
Conclusion first: build the base sphere before adding hat and beard so that the head-to-hat ratio looks balanced.
Practical approach: use a 3.0–3.5 mm hook with worsted or DK yarn as pattern suggests. Crochet the head and body as one piece if pattern allows; then create a hat in contrasting color and a faux-fur or loop-stitch beard. Attach hat slightly tilted for personality. Add a tiny wooden bead or embroidered nose centered under the hat brim.
Troubleshooting: if the hat looks floppy, interface it with a thin cardboard disc hidden inside, or use tighter tension. For consistent sets, weigh components: the hat should be 20–30% lighter in yarn use than the head to keep proportions uniform.
To read Christmas Tablescapes: Beautiful Table Settings
Penguin and snow globe techniques
Conclusion first: focus on stuffing and sealing—proper stuffing prevents flat or lopsided toys.
Penguin structure: crochet body in the round, change to white mid-section, and embroider wings before attaching. Use small safety eyes or embroidered features for a soft look. Snow globe ornaments often combine a crocheted base, stitched scene, and a clear plastic dome or a faux-glass bead stitched over the scene; patterns like those on Joy of Motion Crochet demonstrate assembly tips.
Example trick: pre-mark placement with pins for facial features before stitching. This guarantees symmetry and helps when making multiple ornaments for a set or sale inventory.
Packaging and gifting: wrap amigurumi ornaments in small kraft boxes with tissue and a tag listing yarn and hook sizes. This is a professional touch that increases perceived value for holiday markets and personalized gifts. 🎁
Maya sells sets of three amigurumi ornaments at local holiday markets following this production flow: one evening for parts, one evening for assembly and details, and an afternoon for finishing and packaging. This rhythm keeps production sustainable and creative.
Final insight: mastering tension and assembly elevates amigurumi ornaments from cute to collectible. Prepare tools, practice one model, then scale thoughtfully to maintain quality.
Styling, Gifting, and Selling Crochet Christmas Ornaments: Display Ideas and Seasonal Planning
Answer first: use cohesive color palettes and consistent finishing to create sets that sell and make memorable gifts. A cohesive set increases perceived value and is easier to photograph for Pinterest or shop listings. 📸
Start by choosing a theme—rustic farmhouse, vintage, or bright modern—and use 3–4 yarn colors across all ornaments. Resources like Yarn Society show rustic ideas, while retro Christmas vintage vibes give inspiration for themed palettes.
Gift ideas and personalization
Conclusion first: personalized ornaments with embroidered initials or a year make gifts that become keepsakes. Personalization is a simple finish that dramatically increases emotional value.
Actionable personalization: embroider a small initial on the back of a bauble or add a tiny tag sewn into the seam with the recipient’s name and year. Use metallic thread for subtle shine without overwhelming the handmade look.
Example: a set of three ornaments in a neutral palette tied with twine and a kraft tag can be produced for under $10 in materials per set and sold for $15–$30 depending on local market rates and craftsmanship.
Selling and market-ready presentation
Conclusion first: present ornaments as curated sets in consistent packaging and price them according to time and materials. This converts casual shoppers into buyers at holiday markets.
Tips for presentation: use small kraft boxes with a window, include a care card that lists yarn and hook sizes, and photograph sets on neutral backgrounds for Pinterest and shop listings. For pattern sources and marketing inspiration, reference roundups like Marly Bird and Joy of Motion Crochet’s roundup.
Seasonal planning: begin ornament production 45–60 days before market dates. This timeline allows for testing, batch production, and professional photos for listings. Plan for shipping delays and craft fair booth setup time.
Social strategy: post step-by-step photos and short reels of the making process to Pinterest and Instagram to drive engagement. Include keywords like crochet, Christmas, ornaments, free pattern, and DIY in descriptions to improve discoverability.
Maya’s seasonal plan: two weeks for prototype sampling, three weeks of batch production, and one week for finishing and packaging. This schedule reduces last-minute stress and yields consistent inventory for craft markets.
Key insight: cohesive styling, smart packaging, and clear timelines transform handmade ornaments into profitable holiday offerings and heartfelt gift ideas. Pin these strategies and start planning now. 🎄✨