Show index Hide index
- 1. 5 Beginner-Friendly Crochet Christmas Ornament Patterns That Actually Work 🎄
- 2. Choosing the Right Yarn, Hook & Tools for Fast, Clean Ornaments 🧶
- 3. Step-by-Step: Make a Crochet Christmas Ball Ornament (Beginners Welcome) 🔔
- 4. Decorating, Personalizing & Packaging Ornaments for Gifts and Markets 🎁
- 5. Troubleshooting, Common Mistakes & Pro Tips from a Tested Holiday Maker 🎯


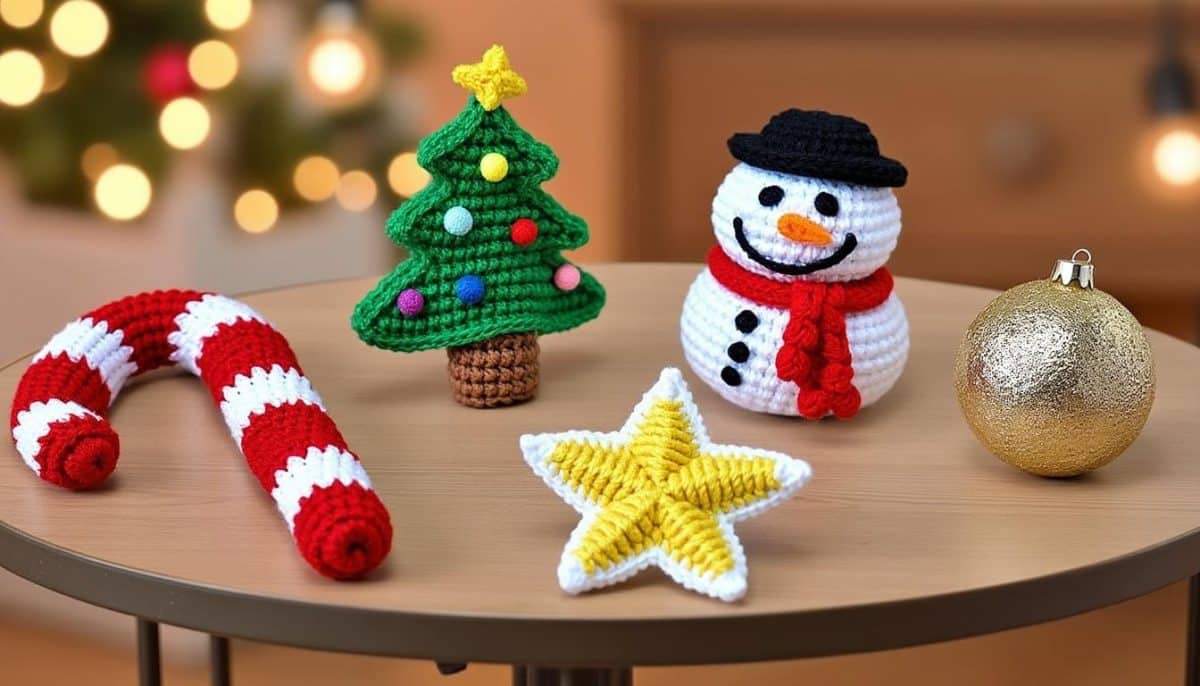
1. 5 Beginner-Friendly Crochet Christmas Ornament Patterns That Actually Work 🎄
Opening (clear and fast): Quick inspiration for holiday makers who want easy, beautiful ornaments without complicated stitches. This section answers the headline right away: Crochet Christmas Ornaments: 5 Beginner-Friendly Patterns that produce tree-ready results fast. 🎁
Answer immediately: The best crochet Christmas ornaments for beginners are baubles, mini stockings, simple stars, tiny sweaters, and snow globe-style covers. These patterns use basic stitches and minimal yarn, so they’re ideal for using up scraps and gifting. ✨
“The best Crochet Christmas Ornaments are: baubles, mini stockings, stars, sweaters, and snow globe covers — because they use simple stitches, little yardage, and adapt to a variety of yarns.”
Quick Answer (short, actionable): Each of the five designs delivers a different outcome that solves common beginner problems. Baubles slip over a clear plastic or glass ball and hide uneven tension. Mini stockings teach shaping with basic increases and decreases. Stars practice working flat and joining. Tiny sweaters are charming gift tags, and snow globe covers use minimal shaping while looking intricate. These projects typically take 20–70 minutes each and use a hook from 3.5mm to 5.5mm depending on yarn. 🎀
Deep Dive (detailed guidance, examples, and proof): Start with yarn choice: cotton or acrylic in worsted or bulky weight works best for quick coverage and crisp stitch definition. Brands like Red Heart, Lion Brand, Caron, Bernat, and Patons offer affordable, widely stocked options. For a fluffier finish, try chenille or velvet-like lines from Hobby Lobby Yarn Bee or Loops & Threads. For smaller, delicate looks, use cotton DK from Knit Picks or DMC. Switch yarn weights carefully: a bulky yarn produces a sizeable ornament quickly but uses more yardage; worsted is a reliable middle ground. 🧶
Pattern-specific tips: For the crochet bauble, work a flat rectangle in continuous rounds using single crochet and spike stitch, then stretch it over a 2.5–3″ clear ornament. The trick is to measure circumference and adjust increase rounds to fit snugly. For mini stockings, chain a base of 12–18 stitches and shape the foot with simple decreases; add a contrasting cuff in slip stitch. A basic star can be made with chains and short rows, then blocked gently for crisp points. Tiny sweater patterns often rely on simple top-down shaping and can be embellished with buttons or embroidered initials. The snow globe cover is ideal for testing tapestry-style color changes in a compact format. 🔔
To read Crochet Christmas Ornaments: Free Pattern Collection
Where to find patterns and visual help: A curated roundup with free and paid tutorials can be found at Petals to Picots holiday ornaments and an accessible beginner guide at CyCrochet how-to for beginners. For visual learners, a tested video walkthrough is available at this YouTube tutorial, which is especially helpful for the spike stitch used on baubles. 🎬
Practical outcome: Pick one pattern and make five variations in different yarns and colours — the results span chic modern to nostalgic vintage, and the fastest crafts double as gift toppers. Save this section for later and use it as a starter checklist. 📌
2. Choosing the Right Yarn, Hook & Tools for Fast, Clean Ornaments 🧶
Opening (50 words): Choosing yarn and tools decides whether an ornament looks handcrafted or unfinished. This section answers exactly what yarn weights, brands, and hooks work best for Christmas ornaments and why those choices solve common fit and finish problems. 🎄
Answer immediately: The best yarns for beginner-friendly ornaments are worsted weight acrylic or cotton — they balance stitch definition with affordability. Recommended brands include Red Heart, Lion Brand, Caron, Bernat, and Patons. For premium cotton options try Knit Picks or DMC. 🧵
“The best yarn and tools are: worsted acrylic or cotton plus a hook that gives you a firm tension — typically 4.0–5.5mm. These combinations reduce distortion when ornaments are handled or hung.”
Quick Answer (100 words): Use a medium weight yarn (size 4/worsted) to make ornaments that are sturdy but not heavy. A 4.0mm or 4.5mm hook usually yields neat single crochet stitches that block well. Bulky (size 5 or 6) is perfect for oversized baubles and textured toys; cotton DK or sport weight is ideal for lacy stars and delicate pieces. Essential tools include stitch markers, yarn needles for weaving in ends, and small stuffing or plastic balls. For colorwork, stash leftovers or mini-sets from brands like Premier Yarns and Loops & Threads are inexpensive and vibrant. 🎨
Deep Dive (200–400 words): Why these yarns and hooks matter: ornaments endure handling, shipping, and repeated storage. Acrylic and cotton provide resilience — acrylic holds bright colours and cleans easily, while cotton keeps crisp shapes and shows stitch detail. Bernat and Caron give accessible texture options; Lion Brand and Red Heart have broad colour ranges and frequent sales, which helps when making bulk batches for markets. For a luxury touch, mix in a strand of metallic with worsted weight from Patons or a small skein from Premier Yarns. 🧵
To read Christmas Ornaments Homemade: DIY Projects with Supplies
Tool specifics: Use a hook one size smaller than recommended on the yarn band if a dense fabric is desired (this helps with baubles). Switch to the suggested hook for lacy stars to avoid over-tightening. Stitch markers are invaluable when working in the round to track rounds, especially for patterns using spike stitch or joining rounds invisibly. A small set of T-pins and a blocking mat helps shape flat ornaments like stars and snowflakes. Embellish with tiny bells, beads, or buttons from craft stores — these are cheap add-ons that sell well for markets. 🛍️
Shopping and budget considerations: Look for yarn mini-sets or “scrap yarn” bundles at local craft retailers or online; they’re perfect for two-tone mini stockings or sweater trims. Many free ornament patterns are designed to be stash-busters. For beginner-friendly pattern collections and free downloads, see Crochet Art free patterns and an inspiring roundup at Once Upon a Cheerio ornaments. 🧾
Insight: Choosing the right yarn and hook upfront reduces replacements later — a well-chosen material set makes five ornaments look like a curated collection rather than random leftovers. ✨
3. Step-by-Step: Make a Crochet Christmas Ball Ornament (Beginners Welcome) 🔔
Opening (approx. 50 words): Clear, stepwise instructions for a classic project: the crochet-covered ball. This answers the headline with an immediate promise: learn one reliable ornament that teaches essential techniques and looks boutique. 🎁
Answer immediately: The best beginner practice piece is the crochet Christmas ball ornament. It uses a simple continuous round, single crochet and spike stitch to create a stretchy cover that fits a 2.5–3 inch plastic ornament perfectly.
“The best ball ornament pattern solves uneven rounds and sizing issues because the crochet piece is worked flat and stretched over a ready-made ball — no shaping perfection required.”
Quick Answer (100 words): Materials: 1 small clear plastic ball ornament (2.5–3″), size 4 worsted yarn (Red Heart, Lion Brand, or Bernat), a 4.0mm (G) hook, stitch marker, and ribbon for hanging. Start with a magic chain or foundation chain that matches the ball’s circumference when wrapped loosely. Work in continuous rounds using single crochet; every 4–6 rounds add a round of spike single crochet to produce vertical texture. Adjust height by adding or subtracting rounds. When the cover fits, cinch the top with a running stitch and secure ribbon. Time: 30–60 minutes. 🕒
To read Christmas Crochet: Patterns for Ornaments and Gifts
Deep Dive (step-by-step, examples, and troubleshooting): Step 1 — Measure and chain: Wrap yarn around the ornament and count loops to get a starting chain of about 36–44 stitches for a 3″ ball. Make a chain matching that number and join with a slip stitch to form a loop, being careful not to twist. Step 2 — Work in continuous rounds: Single crochet into each chain stitch and continue without joining to keep a seamless look. Use a stitch marker at the start of the round to track progress. Step 3 — Add spike single crochets: Every 4–6 rounds, work a spike single crochet by inserting the hook one or two rounds below; this creates an elongated vertical texture that stretches better over the sphere. Experiment with inserting into the third loop on the front for a neat rib effect. 🔍
Step 4 — Testing fit and finishing: Periodically slide the crocheted tube onto the ornament to test fit. If too loose, add more rounds of single crochet; if too tight, switch to a larger hook or remove a round. To close, fold the top edges and use a yarn needle to weave a running stitch, cinching the top tight and knotting securely. Add a ribbon loop and glue a sprig of faux greenery or a small bell. For a cleaner finish, weave in ends neatly and add a tiny stitched name tag. 🪡
Where to see this in action: For a detailed, visual walkthrough on the spike stitch and fitting over a clear ornament, watch the tutorial at this spike stitch ornament video and compare pattern notes at Sit n Crochet’s beginner pattern. These resources help visual learners and confirm sizing adjustments. 🎬
Final insight: Mastering the crochet ball cover unlocks dozens of variations — change stitches, add stripes, or swap yarn to make everything from rustic to glam ornaments that hold up year after year. 🌟
4. Decorating, Personalizing & Packaging Ornaments for Gifts and Markets 🎁
Opening (about 50 words): Elevate simple ornaments into keepsakes by adding personalized details and thoughtful packaging. This section answers how to add visual and sensory appeal that increases gifting value. 🌟
Answer immediately: Turn basic ornaments into memorable gifts by adding ribbons, bells, embroidery, scented stuffing, and custom tags. These touches solve the “handmade looks cheap” problem and make items market-ready.
“The best decoration strategies are: layering textures, adding scents, and presenting ornaments in gift-ready packaging — because buyers notice finishing details.”
To read Christmas Ornaments: DIY Projects and Where to Buy
Quick Answer (100 words): Use ribbon, mini bells, faux greenery sprigs, and a small sewn-in label to upgrade an ornament in under five minutes. For scents, tuck a sachet with peppermint or cloves inside fabric ornaments or dab a drop of essential oil on a cotton ball inside sealed ornaments. For packaging, small cellophane bags with shredded tissue and a kraft tag create a handcrafted vibe. Include a care tag recommending hand wash and storing in a tissue-lined box. Price smartly: cost per ornament should include yarn (often under $1 for small pieces), embellishments ($0.25–$1), and time. 💸
Deep Dive (ideas, examples, and cost breakdown): Embellishment ideas are endless. Add a tiny wooden button or embroidered initial for personalization. Stitching a year or a name with contrasting yarn turns the piece into a keepsake. For extra texture, attach a pom-pom or tassel made from leftover yarn. Scented ornaments are surprisingly effective as gift items: a small pinch of dried orange peel or coffee beans inside a sealed ornament adds a warm aroma that delights recipients. Be mindful of perishables if shipping. 🌿
Packaging strategy for markets and gift-giving: For retail stalls or Etsy, present ornaments in a 3.5″ x 3.5″ kraft box with a clear window and shredded filler. Add a small care card printed with yarn brand suggestions (e.g., Bernat or Lion Brand) and instructions for storage. Attach a looped ribbon so buyers can immediately hang the ornament. For gift toppers, tie the ornament onto wrapped presents — it doubles as decor and a small gift. 📦
Pricing note and bundle ideas: Sell single ornaments or sets of three with a colour story (e.g., traditional red/green/gold or modern pastels). Break down costs: yarn ($0.50), filler and embellishments ($0.75), labor (20–45 minutes valued at local rates), and packaging ($0.50). Bundled sets create higher perceived value and faster turnover at holiday markets. For pattern and packaging inspiration, check curated ideas at Simply Made by Erin and creative roundups at Lovable Loops. 🎀
Insight: Small finishing touches transform a quick make into a cherished gift; invest 5–10 minutes in embellishment and packaging to significantly increase perceived value. ✨
5. Troubleshooting, Common Mistakes & Pro Tips from a Tested Holiday Maker 🎯
Opening (50 words): Problems like uneven tension, poor fit on balls, and fraying ends can sabotage a batch. This section quickly names the fixes and shares pro tips from someone who’s tested dozens of ornament patterns at markets. 🔧
Answer immediately: The most reliable fixes are measure and test-fit often, choose the right hook size, weave ends securely, and use stabilizing fillers. These solve fit, durability, and presentation issues.
To read Christmas Crochet Patterns: Quick Gifts for Beginners
“The best troubleshooting moves are: test-fit as you go, opt for tighter tension on baubles, and secure decorative parts with strong stitching and glue when necessary.”
Quick Answer (100 words): If a cover doesn’t fit the ornament, either increase/decrease rounds or change hook size. For loose stitches, use a smaller hook or add a round of slip stitches to tighten the fabric. Avoid visible ends by weaving them in with care and applying a tiny dab of clear fabric glue for high-touch pieces. When making items for sale, pre-wash or block any cotton pieces to avoid later shrinkage. For market durability, reinforce hanging loops with extra stitching and a dab of glue under ribbon knots. 🔒
Deep Dive (practical fixes, examples, and anecdotes): Common mistake: following a pattern exactly without testing gauge. Simple fix: crochet a 2″ swatch and hold it over the ornament to check fit. Example: a vendor made 100 baubles with a loose gauge and had to rework half the stock; the lesson was to test one prototype per yarn/hook combination. Another frequent issue is the ornament sagging at the top after months; the cure is to create a small inner loop of thread across the top interior and knot it, giving extra support to the hanging ribbon. 🧵
Pro tip on stitching and durability: For ornaments that will be handled, secure small attachments — bells, buttons, beads — with a leather needle and then backstitch from the inside. Use polyester stuffing sparingly and consider placing a small cardboard disc inside the base of plush ornaments to maintain shape. For delicate yarns like velvet or chenille, stitch from the inside out to prevent surface fuzz compression. Example: a seller used Loops & Threads chenille for plush stockings; reinforcing seams with an interior whip stitch cut returns on complaints about splitting. 🔁
Visibility and discoverability for sellers: Photograph ornaments on a neutral evergreen branch and include close-ups of stitches. Use keywords such as handmade crochet ornament, Christmas bauble cozy, and brand cues like Red Heart or Bernat to help buyers find listings. For creative patterns and alternate instructions, see handpicked guides at Easy Crochet beginner patterns and Crochet Art. 🎯
Bonus resources and cultural note: For vintage-inspired ornament vibes and historical trims that are trending in 2025, explore traditional Victorian-era decoration ideas at Victorian Christmas traditions and retro color palettes at Retro Christmas vintage vibes. For creative presentation ideas, see holiday craft gift baskets at teacher gift basket ideas. 🎄
Final insight: Testing, thoughtful finishing, and intentional photography turn a simple ornament into a repeat seller — focus on one prototype per yarn choice, and scale from that proven model. Save this tip for your next batch! 📌