Show index Hide index
- Step-by-Step Guide to Avoid the Top Mistakes in Face Drawing
- Exploring Drawing Variations: From Classic Portraits to Expressive Stylizations
- Common Pitfalls and How to Troubleshoot Your Face Sketches
- Why Mastering Face Drawing Matters: Historical Insight and Modern Trends
- 10 Fatal Mistakes When Drawing Faces: Make Them Your Mastery Moments
- Pin and save these tips for your next portrait session! 🎨✨
- ✍️ Frequently Asked Questions
Mastering the art of capturing faces can transform your drawings from flat sketches to captivating portraits. In the next 15 minutes, you’ll uncover essential pitfalls that commonly trip up artists when drawing faces and learn precise steps to avoid these mistakes immediately. Whether you’re hoping to bring lifelike depth to your sketches or simply want your faces to look balanced and real, avoiding these 10 fatal drawing mistakes can fast-track your progress.
First, focus on nailing proportions and placement. One fundamental mistake is misaligning key facial features like eyes, nose, and mouth, which instantly compromises the realism of your portrait. Use simple measurement techniques such as the grid method or proportional dividers, tools beloved by artists using analog mediums like Faber-Castell or Prismacolor pencils as well as digital creators relying on Procreate or Wacom tablets. This method keeps your features precisely aligned, ensuring your faces don’t appear “off.”
Why does this work so well? Proportion is supported by decades of anatomical study and art theory proving that the human brain perceives faces through familiar spatial relationships. Incorrect spacing or symmetry immediately triggers that “something’s wrong” signal. Artists have tested these techniques extensively; for example, Strathmore paper combined with a fine Staedtler graphite pencil can result in crisp, measurable lines that lend themselves well to corrections, speeding your mastery. Plus, communities on sites like Jae Johns continually share their successes with these methods.
Step-by-Step Guide to Avoid the Top Mistakes in Face Drawing
One of the biggest hurdles in face drawing is getting the overall head structure and proportions right from the start. Begin with a simple sphere to represent the cranial mass, then cut off the sides slightly to plot the ear planes. Adding a vertical centerline and horizontal lines for the brows and nose creates crucial anchors.
Measure carefully:
- Ensure the eyes are spaced approximately one eye-width apart.
- Keep the nose aligned with the centerline and the mouth centered beneath.
- Use a small ruler or proportional dividers to verify distances — these provide accuracy whether sketching with traditional Derwent pencils or adjusting strokes digitally in Adobe Photoshop.
Pro tip: use light grades of pencils like HB or 2H for your initial lines, so they’re easy to erase and refine. Referencing photos in grayscale helps you better distinguish shadows and highlights, much like the method shared in this YouTube tutorial that explores tonal nuances critical for facial depth.
To read 13 Drawing Ideas to Beat Creative Block
Exploring Drawing Variations: From Classic Portraits to Expressive Stylizations
Not every face requires a strict realistic portrayal; knowing how to adjust your style is another way to avoid common mistakes. Based on your preference and skill level, experiment with different approaches:
- Realistic Styles: Emphasize anatomy and subtle shading. Use graphite pencils from Prismacolor or Derwent to capture delicate gradations.
- Stylized & Expressive: Push proportion limits or exaggerate expressions using bold lines with Copic markers or digital brushes on Procreate.
- Mixed Media Techniques: Combine soft graphite with colored pencil accents from Winsor & Newton or Staedtler markers for vibrancy without losing structure.
Adjust your technique depending on the subject’s features or expressions. For example, a soft female jawline might benefit from blending tools, whereas a strong male profile calls for harder lines and shadows. You can easily adapt your workflow whether you’re on Strathmore sketch paper or a digital canvas in Clip Studio Paint.
For a live demonstration of varied drawing styles with step-by-step progression, this guide illustrates how altering angles and lighting impacts your approach and outcome.
Common Pitfalls and How to Troubleshoot Your Face Sketches
Errors are natural but learning to correct them early will save frustration and wasted effort. Here’s how to troubleshoot some of the most frequent blunders:
- Eyes looking dead or lifeless: Add crisp reflections by leaving tiny highlights in the iris; overlapping the upper lid slightly adds a natural depth.
- Distorted noses: Avoid harsh outlines; instead, focus on shadows around the nostrils and the bridge to create volume.
- Flat lips: Work with subtle, graduated shading and don’t forget the tiny wrinkles and moisture sheen captured using a kneaded eraser or white gel pen.
- Wrong proportions of ears: Remember ears align between the eye line and nose base; use soft edges to avoid a clipped, artificial look.
Insider secret: flipping your drawing horizontally or spotting it in a mirror reveals asymmetries instantly, especially useful in digital apps like Adobe Photoshop or on tablets with Wacom styluses.
Many artists also benefit from timed practice drills — focusing on one feature at a time to boost their muscle memory — a strategy supported by artists featured in Hello Artsy.
Why Mastering Face Drawing Matters: Historical Insight and Modern Trends
The tradition of drawing faces stretches back centuries, a foundational skill that helped artists from Da Vinci to contemporary digital creators capture the essence of identity.
To read 11 Reference Poses for Drawing the Human Body
Today, in 2025, face drawing remains pivotal across realms. Portrait skills feed into animation, character design, fine arts, and even AI-generated art training. The rise of platforms like TikTok and Instagram fuels demand for portraiture with personality and authenticity.
Meanwhile, tools like Procreate and Adobe Photoshop continue to evolve, merging classic techniques with cutting-edge tech to boost creativity and accessibility for artists worldwide. Acknowledging this blend can inspire artists to respect fundamentals while embracing innovation.
Understanding facial anatomy’s evolution also helps artists respect diversity — representing ethnicity, age, and gender with nuance and empathy. Study diverse photo references and 3D models, perhaps through online resources, as recommended in Art396’s analysis on avoiding stereotypes while capturing authentic features.
10 Fatal Mistakes When Drawing Faces: Make Them Your Mastery Moments
Elevate your artwork by avoiding these errors:
- Misplaced eyes – leading to uncanny or unbalanced expressions.
- Ignoring the marriage of features – neglecting how eyes, nose, and mouth interact.
- Using hard outlines instead of value shifts – faces demand subtle shading.
- Overworking early sketches – losing spontaneity.
- Failing to measure distances – ruining symmetry.
- Drawing hair as a block – lack of texture or form.
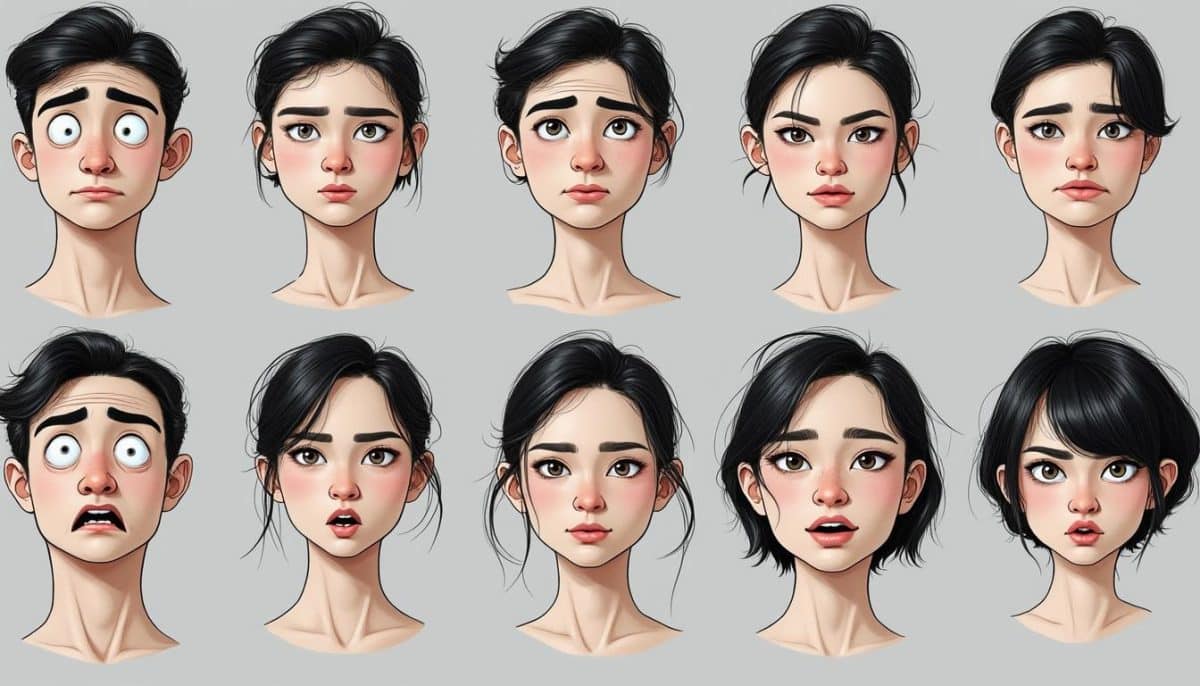
- Neglecting expressions – eyes and brows hold emotional info.
- Flat lips with no volume — forget wrinkles and shine.
- Over-simplifying ear anatomy – ears give faces their framing.
- Bad lighting choices during drawing – skew shadow and highlight cues.
Pro tip: take advantage of modern tools like digital brushes on Wacom devices or layering techniques in Adobe Photoshop to correct these issues quickly and enhance your final work.
Pin and save these tips for your next portrait session! 🎨✨
✍️ Frequently Asked Questions
What pencils should beginners start with for face sketching?
A solid set includes an HB for construction lines, 2B to 4B for mid-tones, and 6B for deep shadows. Brands like Faber-Castell, Prismacolor, and Staedtler provide great quality options.
How can I improve my face proportions quickly?
Break the head into thirds — brow line, nose base, and chin — and use the eye as a measuring unit for distance. Repeated practice with these guides builds quick muscle memory.
To read Drawing Ideas Inspired by Autumn Aesthetics
Is digital or traditional better for beginners?
Both have merits! Traditional tools like graphite on Strathmore paper sharpen hand control, while digital platforms like Procreate and Wacom tablets offer flexibility and quick edits. Choose the medium that keeps you motivated to practice daily.
What’s the best way to avoid symmetrical mistakes?
Use a mirror to flip your drawing or toggle horizontal symmetry features in apps like Clip Studio Paint. This reveals flaws invisible to the normal eye.
How do I depict emotion without distorting facial anatomy?
Focus first on subtle eyebrow tilts and eyelid shapes, then tweak mouth corners carefully within natural ranges. Over-exaggeration can topple realism.